

Card 5" X 6 1/2"
Bigshot
Pink Cardstock
Sizzix Texture plate - Flowers #4
Sizzix Polka Dot Folder
Spellbinders Lacey Circles die - 2nd largest die
Spellbinders Standard Circles Large - 3rd largest
Tan Embossing Mats
Martha Stewart Butterfly punch
Faux Pearls
Making Memories pink flowers with rhinestones (cover rhinestone with faux pearls)
3 pieces of pink grosgrain ribbon cut at 4" each
Glue dot
Dimensionals
Sentiment - Wonderful Mother
Versamark Perfect Plumeria ink pad
Using Sizzix Texture Place - Flowers #4 - Emboss front of card
Pink Cardstock cut at 2 1/4" X 6 1/2" - emboss with polka dot folder
Cut one lacey circle
Cut one standard circle then emboss using tan mats - stamp with sentiment
Punch one butterfly
Fold each piece of ribbon in half and secure in loop with glue dot - secure to left top of cardstock with embossed polka dots
Secure cardstock with loops to front center of card as shown
Add dimensionals to embossed standard circle and then adhere to lacey circle
Add dimensionals to bottom of lacey circle and adhere to right side of card and center as shown
Add all flowers to edge of ribbon loops and card using glue dot
Adhere butterfly to sentiment stamped circle as shown
Adhere faux pearls to bottom of card along edge following pattern
Adhere small faux pearl to butterfly at head
Happy Easter

Card 5" X 6 1/2"
Mauve cardstock
Yellow cardstock
Martha Stewart Border Punch
Big Shot
Happy Easter Sentiment
Spellbinders Nestabilities - Circle die 3 1/4" - stamp with sentiment
Mini Mauve Paper Rose
Ribbon - 4" - fold in half and create loop secure to underside of left side of circle
3 faux pearls
Dimensionals
Yellow cardstock cut at 5" X 6 1/2" adhere to front of card
Yellow cardstock cut 2" X 5 1/2" - adhere to center of mauve cardstock - adhere all to center of card
Adhere circle to card as shown using dimensionals
Adhere mini rose to ribbon as shown
Adhere faux pearls as shown
Fresh and Crisp

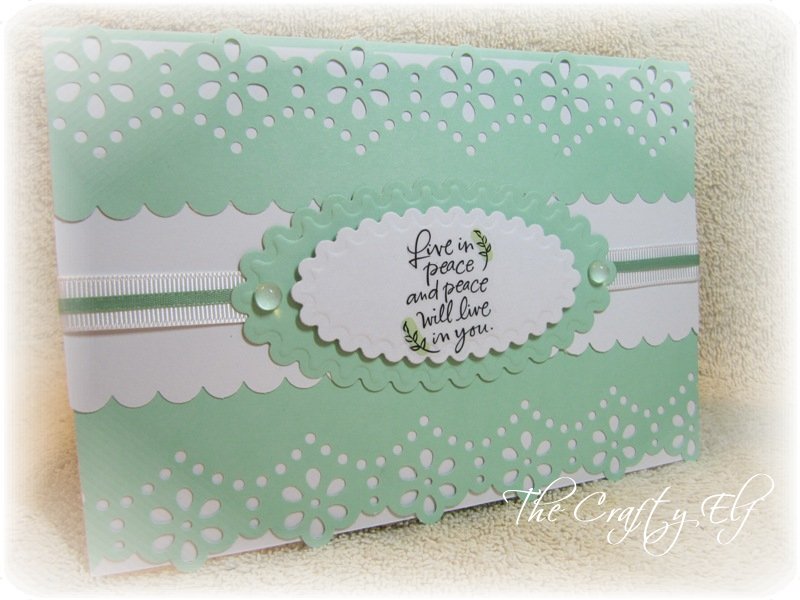
Card 5" X 6 1/2"
EK Success large border punch
Gable green cardstock cut at 3" X 6 1/2" - border punch on both long ends
Bigshot
Labels 14 - 2 1/2" X 1 3/4" die - cut and embossed
3 faux perals
White ribbon
Light green mini paper ribbon
Dimensionals
Adhere all to card as shown above
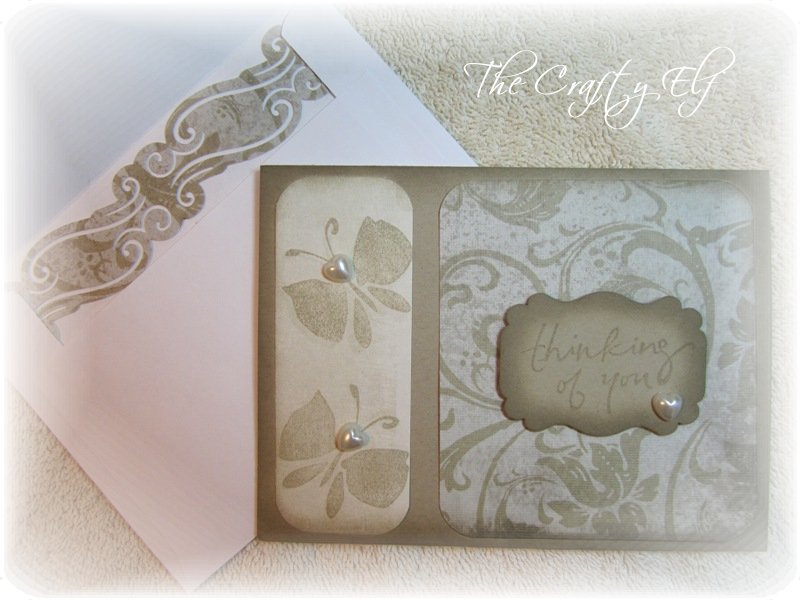
Note Card Holder

White Cardstock
Hampton Art - Culicue Butterfly Stamp Set
Purple, Pink, Green and Yellow Ink pads
Pink Ribbon
Clear Reusable Storage Bag 4" X 5" (bag of 40 purchased from dollar store)
1/2" Circle Punch
Scoring Tool
Cut cardstock 4 1/2" X 10 1/2"
Score at 1", 5 1/2", 6". 6 1/2" and 10"
Fold along all score lines and at the 6" score line fold in the opposite direction to create pleat
At the 1" fold (top of folder) fold and adhere closed
At the 1/2" score line (bottom of folder) fold and adhere closed
Fold up Holder, using 1/2" punch center along top of holder and punch hole
Stamp front of card holder with butterfly, stamping each colour twice as shown
Using hello sentiment, stamp once on front cover with each colour as shown
Add adhesive to bottom 1" of reusable bag, flipping bag over and turning upside down so top of bag is now facing bottom of holder, secure bag to holder just above the 5 1/2" score line
Flip bag back so the top of the card holder and top of bag are facing same way. Add note cards and envelopes to bag.
Add glue dot or adhesive to back of bag to gently hold in place
Place ribbon through hole and tie in front as shown
Celebrate Spring

Card 4 1/4" X 5 1/2"
White cardstock
Yellow cardstock
Bigshot
Spellbinder Nestabilities - blossoms
Jolee's flower embellishments
Clear cling sentiment stamps - celebrate and spring, adjust to fit area to stamp
Memento Ink - Bamboo leaves
NOTE - Youtube provides videos on double embossing using either Cuttlebug, Bigshot or whichever machine you own. Follow along with these videos or use your Spellbinders pamphlet to double emboss.
Bigshot Video to double emboss (click on link)
Cuttlebug Video to double emboss (click on link)
White cardstock
- cut one at 4 1/4" X 11" - score along long side at 5 1/2" and fold to make card
- cut one at 3 7/8" X 5 1/8"
- cut one and emboss blossom frame (using two smallest blossoms)
- cut one at 4 1/8" X 5 3/8"
Double emboss white cardstock measuring 3 7/8" X 5 1/8" keeping smooth area in top left corner of card as shown.
Stamp sentiment to smooth area of white cardstock, adhere frame then adhere piece to front of card
Add embellishments to front lower right corner of card as shown
K & Company - Mauve

Card 4 1/4" X 5 1/2"
K & Company designer paper - Julianne (choose 3 papers)
Tim Holtz - Elegant Flourishes
Big Shot
Craftable Paper Flowers (Michaels)
Pale Plumb Ink Pad
Sponge Dauber
Oval Punch 2"
Scallop Oval Punch 1 1/2"
Making Memories Pink Rhinestone Brads
Clear Cling Sentiments - love
Stickles
Scallop border Punch
Dimensionals
Designer Paper #1 - lined
- cut one 3 3/4" X 4 1/4" - using scallop punch, punch along one long end
- cut one 1 3/4" X 4 1/4" - using scallop punch ,punch along one long end
- punch one using scallop oval punch - stamp sentiment "love"
- cut one 1 1/4" X 4 1/4"
- cut one using oval punch
- cut one 2" X 4 1/2 " and place over smaller flourish on Tim Holtz die and run through Bigshot - using stickles cover die and set aside to dry
Using sponge dauber and pale plumb ink pad sponge tips of petals on flower
Adhere designer pattern paper measuring 1 1/" X 4 1/4" to top of card
Adhere solid designer paper with scallop edge just slightly overlapping patter paper on front of card
Adhere lined designer paper to bottom of card
Adhere flower to right side of card and center on solid colour
Open prongs of brad wide and pop out rhinestones on three brads or use matching rhinestones and adhere three to the left side of the solid designer paper as shown
Using dimensionals adhere scallop oval with sentiment to large oval and then adhere those using dimensionals to cards as shown
Adhere flourish to card and center between rhinestones and flower as shown on card
K & Company Note Card Folder


This is a slight variation to the Vintage Ladies Card Holder below.
White cardstock
Blue Brocade Ink pad
Scallop border punch
EK Success 3" Scallop circle punch
1 3/4 Scallop circle punch
1" circle punch
slot punch
Piercing tool
Hampton Art Rubber Stamp Set - alphabet used letter "D"
Pear gem embellishments
Clear resealable bag 4" X 5"
White cardstock
- cut one 4 1/2" X 10 1/2"
- score at 1", 5 1/2", 6", 6 1/2" and 10"
- fold at all score lines making sure to fold the 6" score line in the opposite direction creating pleat
- fold the 1" score line in towards center of card and adhere
- fold the 10" score line in towards center of card and adhere
Designer Paper #1 - solid
- cut one at 1" X 4 1/2" - adhere on inside of folder at top covering the slot punches, using slot punch punch over top of original punches lining up from outside back of folder
- cut one 3" X 4 1/2" adhere to outside top of front flap of folder
- punch one using 1 3/4" scallop circle punch - pierce scallops
Designer Paper #2 - lined
- cut one at 2" X 4 1/2 inches - punch along one long side using scallop border punch and adhere to front bottom flap of folder
Designer Paper #3 - pattern
- punch one using 3" scallop border punch and adhere to front center of folder
- punch one on part of designer paper with no pattern and stamp with letter of choice (I used "D")
- adhere 1" circle to 1 3/4" scallop circle using dimensionals and then adhere those to 3" scallop circle on front of folder using dimensionals
Adhere 3 pearl gems to front top right side of folder
Add adhesive to front bottom of resealable bag (bottom 1" of bag) fold back under and secure above 5 1/2" score line. Add adhesive to back side of bag in the middle to secure to folder as well
Add 3" X 3" note cards and fold down top 1" of bag towards back close folder
Tuck front of folder under flaps from slot punch to secure
Hello - K&Company

Card 4 1/4" X 5 1/2"
Designer Paper K & Company - Julianne
Pink ribbon
Pink Flowers by Prima
Clear gem embellishments
Stickles
VersaMagic - Perfect Plumeria Ink
Hampton Art Curlicue Butterflies stamp set - hello
Designer Paper #1 - solid
- cut one at 4 1/4" X 5 1/2"
- cut one at 1 1/4" X 3 3/4"
- cut one at 1" X 3 1/2"
- cut one at 4" X 5 1/4"
Adhere large solid designer paper to front of card
Adhere large patterned paper to front of card sliding under ribbon
Adhere remaining two designer papers together stamp right bottom corner with sentiment
Add clear gem embellishments to bottom left corner of lined paper as shown
Adhere flower to front of card on bow and and stickles to center of flower
Thank You - K&Company

Card 5" X 6 1/2"
Designer paper K&Company - Julianne (choose 3 papers)
EK Success 3" Scallop circle punch
Marvy Flower Punch
Scallop border punch
Pearl Gem embellishments
Designer Paper #1 (lined)
- cut one at 4 1/2" X 6 1/2" - using scallop punch, punch along one long side
- cut one 1 1/2" X 6 1/2"
- cut one 3 3/4" X 5"
- punch one using 3" scallop circle
- punch 3 flowers using floral punch
- cut one 3 1/2" X 4 3/4"
- punch one using 3" scallop circle
Adhere lined paper to front of card overlapping scallop edge over solid paper
Adhere patterned paper with bird, bug and floral to solid paper measuring 3 3/4" X 5" then adhere to card approx 1/4" down from top of card and 1/4" in from left side
Adhere scallop punches together and just off to one side for shadow effect as shown on card then adhere to card just in from bottom right side of card as shown
Adhere three flowers to bottom right corner as shown
Adhere all pearl gems as shown
Vintage Ladies Folder

Heavy cardstock
Designer Papers
Scallop Border Punch
1 1/2" circle punch
1 3/8" circle punch
Cling Hampton Art Vintage Ladies stamps (Michaels)
Inkadinkado - Black ink pad
Ribbon - Approximately 27"
Clear resealable storage bag 4" X 5"
2 White Brads
Dimensionals
Cut Heavy Cardstock 4 1/2" X 12"
Score at 2 1/2 ", 7", 7 3/4" and 8 1/2"
Note - the 7 3/4" score line is to be folded to create a pleat (fold in opposite direction)
All other score lines, fold as usual
Polka Dot designer paper
cut one 4 1/2" X 4 1/2"
Damask designer paper
cut one 4" X 4 1/2" - using scallop border punch, punch along one long side
Striped designer paper
cut one at 2 1/2" X 4 1/2" - using scallop border punch, punch along both long sides
Black Cardstock
punch one using 1 1/2" circle punch
Stamp one Vintage Ladies head and punch with 1 3/8" circle punch - adhere to 1 1/2" black circle
Adhere Polka dot paper to bottom front of folder
Adhere Damask to top front with scallop edge at bottom
Adhere Striped paper approx. 1/2" down from top of folder
Adhere Vintage lady to front top flap overlapping edge
Using 2 brads secure ribbon to back of folder with tongs of brads on inside of folder - each brad place about 1" in from sides.
Add strong adhesive to bottom inch of front side of clear bag. Turn bag over and upside down. Place bottom of bag on inside of folder one inch above 7" score line - press to secure. Fold bag back up towards top of folder with zip lock just above brad tongs. Add glue dot to under side of bag to secure in place.
Add note cards and envelopes to bag and secure.
Fold up and tie ribbon in bow
Vintage Lady

Card 4" X 51/2"
Inkadinkado black ink
Cling Vintage Ladies stamps from Hampton Art
Stampin Up "You're Fabulous" Bubble Queen stamp set
3 pearl embellishments
Stamp-a-ma-jig
Elmers Adhesive Dot Stamper
Dimensionals
1 3/8" circle punch
1 1/2" circle punch
1" scallop punch
2" scallop punch
3" scallop punch
Scallop border punch
Recollections (from Michaels) "Elegance" printed cardstock
Cream cardstock
Black cardstock
Black cardstock
- cut one 3 1/2" X 5"
- punch one using 3" scallop punch
- punch two using 1 1/2" circle punch
- punch one using 3" scallop punch - stamp "You're Fabulous" to center using stamp-a-ma-jig
- stamp 1 Victorian Lady and punch out using 1 3/8" circle punch
- punch one using 1 3/8" circle punch
- polka dot - cut one 1 1/2" X 3 1/4" punch both sides with scallop border punch
- punch one using 1" scallop circle
- damask - cut one 3 1/4" X 4 3/4"
- punch one using 2" scallop circle
Adhere cream circle to the remaining black cardstock circle using dimensional
Adhere polka dot scallop circle to cream circle using dimensional then adhere to 2" damask scallop circle
Adhere black rectangle cardstock to front of card
Adhere damask rectangle to front of card and center on black cardstock
Adhere black scallop circle to bottom of card just up from edge of damask cardstock as shown
Adhere polka dot border punched card stock to top of card approx. 1/4" down from edge of damask
Adhere cream stamped scallop circle down 3/4" from top edge of damask
Adhere damask scallop circle to center of black scallop circle
Adhere circles with Victorian lady to center of polka dot scallop border as shown on card
Adhere 3 pearl embellishments as shown
Green - Challenge
Card 5" X 7"
Martha Stewart Flower Border Punch
Stampin Up Scallop Border Punch
Clear Gems Embellishments
Hallmark Sentiments
Spellbinders Nestabilities - Scalloped Ovals
Bigshot
Green Card Stock
White Card Stock
White Ribbon
Green Ribbon
Stampin Up Crystal Effects
White Card Stock
- cut one at 2" X 7"
- cut one at 3 1/4" X 7" - punch along one long side using flower scallop punch
- cut one using 3 1/4" scalloped oval Nestabilities run through Bigshot again to emboss
- Cut one at 2" X 7" - punch along one long side using flower border punch and punch along the other long side using scallop punch
- cut one using 4 1/4" scalloped oval Nestabilities run through Bigshot again to emboss
Adhere white ribbon to white card stock 5/8" up from scalloped edge, adhere green ribbon to center of white ribbon
Adhere the white card stock with ribbon to front of card 1/16" down from top of card
Adhere green card stock with both long sides punched with border punch aligning the the edge of the flower border punch with the top edge of the card
Adhere green scalloped oval to center of card
Adhere sentiment to centerof white scalloped oval and then adhere to green oval using dimensionals
Add clear gem embellishments to either side of green scalloped oval
Mother

Card 5" X 7"
Inkadinkado stamp with butterfly and pocket watch (stamp 3 times)
Stampin Up Stampin Around Handles - Jumbo
Stampin Up Very Victorian Jumbo wheel
Black Ink Cartridge for Jumbo wheel
Making Memories Oval Embellishment
Pearlstrings
Tim Holtz Distress Ink - Antique Linen
Lace ribbon
Black paper ribbon
Oval Sizzix Label Oval #3
Bigshot
Well Scripted - Wonderful Mother (wonderful taped off)
Painters tape
Stampin Up - Crumb Cake card stock
Stampin Up - Black Card stock
Inkadinkado - Large Black Ink Pad
Dimensionals
Flower Soft High Tack Glue
Stamp-a-ma-jig
Black Card stock
- cut one at 5" X 7"
- cut one at 3" X 3 3/4"
- cut one using oval sizzix label #3
- cut one 6 7/8" X 4 7/8" roll with Very Victorian Jumbo wheel
- using inkadinkado stamp, stamp 3 times on Crumb Cake card stock
- then cut one of the images to 2 7/8" X 3 6/8"
- cut out 2 of the butterflies along with the attached circle stamp
- cut out 1 large butterflies
- cut out pocket watch
Adhere Crumb Cake card stock with rolled image to front of card
Cut one piece of black paper ribbon at 6 7/8" in length
Cut one piece of lace ribbon at 6 7/8" in length - stamp lace ribbon with Distressed Antique linen ink pad then attach to middle of black paper ribbon
Adhere to front of card 1 1/8" down from top of card
Adhere remaining stamped image on Crumb cake card stock to remaining Black card stock
Attach large butterfly, pocket watch and small butterfly with round stamp directly over same images using dimensionals
Adhere to front of card 1/2" in from left side of card and centerbetween top and bottom of card
Punch or cut oval to fit oval embellishment - stamp with Well scripted "wonderful Mother" taping off the word wonderful and using Stamp-a-ma-jig adhere inside embellishment
Using brads adhere embellishment to black oval
Center and attach to bottom right corner of card as shown
Attach pearl string to card along middle of lace ribbon as shown using Flower soft glue
Attach final butterfly to top right corner along edge of black paper ribbon
Smile

Punches
1 3/4" scalloped
1 3/8" circle
1 1/4 circle punch
Martha Stewart Loop corner punch
Martha Stewart Look border punch
Cuttlebug
Cuttlebug Provo Craft Swirl embossing folder
Clown Image from McMahon Five Designs
Print image (to fit on 1 3/4" X 2 1/4") on paper appropriate for Copic Markers and colour image
Copic Markers
Piercing tool
White Card stock
Yellow Card stock
Blue Card stock
Green Card stock
Desinger Paper K & Co.
Card 5" X 6 1/2"
Designer Paper
- cut one at 5" X 6 1/2"
- cut one 1" X 3"
- cut one 2 1/4" X 2 3/4"
- run both piece of white card stock through cuttlebug using swirl embossing folder
- cut one at 3 1/4" X 4"
- cut one at 2 1/4" X 2 1/4"
- cut one at 2" X 3 1/4" - punch one side with loop border punch along long side
- punch one using 1 3/8" circle punch
- cut one at 3" X 3 3/4" - punch one side with loop border punch along long side
- cut one at 2" X 2"
- cut one at 2 1/2" X 3 3/4"
- punch one using 1 3/4" scalloped circle punch, pierce scallops
- cut one at 3 1/4" X 3 1/4" punch along all edges using edge and border loop punches
- punch one using 1 1/4" circle
Adhere white embossed card stock measuring 2 1/4" X 2 3/4" to Green card stock with loop edge then adhere those to blue card stock measuring 3 1/4" X 4"
Adhere to left side of card 1/2 inch in from left side of card and center between top and bottom of card
Adhere white embossed card stock measuring 1" X 3" to blue card stock with loop edge then adhere those to green card stock measuring 2 1/2" X 3 3/4"
Adhere to right bottom of card 1/2" in from side edge and 1/4" up from bottom
Adhere remaining green card stock square to remaining blue card stock square then adhere those to yellow looped square. Turn so diamond shape and adhere coloured image to center. Adhere to card 1" from left side of card edge and center between top and bottom of card.
Adhere sentiment to yellow circle then adhere to blue circle then adhere to green pierced scallop circle using dimensionals. Adhere and center to top right corner of card as shown.
Use It Tuesday Challenge #2

Card 5" X 7"
DCWV designer paper - Nana's Nursery - choose 3 designer papers
Martha Stewart - Loop border punch
3 paper flowers
Boutique Fleur - Mini Round Gems (3)
Chipboard sentiments 1) friends forever 2) hugs & Kisses
Dimensionals
Designer paper #1
- cut one at 4 3/4" X 6 3/4"
- cut one at 1 1/4" X 5 1/4"
- cut one 4 1/4" X 5 3/4"
- cut one 2" X 3" - use loop border punch on one of the long sides
Adhere designer paper #2 measuring 4 1/4" X 5 3/4" to card
Adhere designer paper #1 measuring 1 1/4" X 5 1/4" to card
Adhere designer paper #3 to right side overlapping loops on designer paper as shown on card
Adhere chipboard sentiments as shown on card
Adhere mini round gems to center of all three flowers and adhere flowers to card as shown
Clown

Card 5" X 6 1/2" Digital Stamp Clown from McMahon Five Designs
Copic Markers
Cuttlebug
Sizzix Polka Dot Embossing Folder
Light Blue card stock
White card stock
Dimensionals
Print digital stamp on appropriate paper
Image should be no bigger than 2 1/2" X 2 7/8"
Cut paper with image to 2 3/4" X 3 1/8" - colour with Copic markers
Using scoring blade, score front of card 1/8" on all sides
White card stock
- cut one 4 1/4" X 5 3/4" - using Polka dot embossing folder, run through Cuttlebug to emboss
- cut one 3 1/2" X 4"
- cut one 4 1/2" X 6"
- cut one 3 3/4" X 4 1/4"
- cut one 3 1/4" X 3 3/4"
Adhere white embossed card stock to card
Adhere blue card stock measuring 3 3/4" X 4 1/4" to card 1 1/8" from top and bottom of card
Adhere white card stock measuring 3 1/2" X 4" to card
Adhere blue card stock measuring 3 1/4" X 3 3/4" to card
Using dimensionals adhere image to card
Christmas Shopping

Christmas Shopping digital image purchased from McMahon Five Designs
Copic Markers
Stickles
Scoring tool
Stampin Up card stock Real Red
Black card stock
White card stock
Dimensionals
Card 5" X 6 1/2"
Print image on appropriate paper for Copic Markers and colour. Use Stickles for fur
- size image to approx. 1 5/8" X 3 3/8" and cut image to 1 3/4" X 3 1/2"
- cut one at 4 3/4" X 6 1/4" - score 1/8" on all sides with scoring tool
- cut one at 2 1/4" X 4"
- cut one at 3 1/2" X 5" - score 1/8" on all sides with scoring tool
- cut one at 2" X 3 3/4"
Center and adhere large White card stock to card
Adhere Black card stock to coloured image
Adhere Real Red card stock to Black Card stock and image - adhere to center of card using dimensionals
CakeBella

Card 5" X 6 1/2"
Stamping Bella - CakeBella
Clear Cupcake Set Stamps - "Sweet Birthday Wishes" from Michaels
Memento Ink - Tuxedo Black
Copic Markers
Marvy Flower Punch
Boutique Fleur - Mini Round Gems
Cuttlebug
Sizzix Polka Dot Folder
Martha Stewart Double Edge Punch - Infinite Loop Trim
Stampin Up Card stock - Real Red and Chocolate Chip
White Card Stock
- cut two 1 1/2" X 4 1/2" using polka dot embossing folder run through Cuttlebug
- cut one 3" X 4 1/2" using polka dot embossing folder run through Cuttlebug
- cut one 2" X 3 1/2 stamp with Cakebella using Memento Tuxedo Black ink - colour with Copic Markers
- cut one 1 1/2" X 3 3/8" stamp with Sweet Birthday Wishes sentiment
- cut one 1 3/4" X 4 3/4" mat this to embossed white polka dot card stock measuring 1 1/2" X 4 1/2"
- cut one 1 1/2" X 4 3/4" punch using Double Edge punch
- cut one 1 7/8 " X 3 7/8"
- cut one 2 1/4" X 3 3/4"
- punch 3 flower using Marvy flower punch
- cut one 1 3/4" X 4 3/4" mat this to embossed white polka dot card stock measuring 1 1/2" X 4 1/2"
- cut one 1 1/2" X 4 3/4" punch using Double Edge punch
- cut one 2 1/2" X 4"
- cut one 3 1/4" X 4 3/4"
- cut one 1 5/8" X 3 5/8"
- punch 3 flowers using Marvy flower punch
Adhere chocolate chip loop trim piece to matted chocolate chip and white polka dot embossed card stock 1/4" in from one end
Adhere remaining white polka dot embossed card stock measuring 3" X 4 1/2" to chocolate chip card stock measuring 3 1/4" X 4 3/4"
Adhere coloured Cakebella on white card stock to red card stock measuring 2 1/4" X 3 3/4" then to chocolate chip card stock measuring 2 1/2" X 4"
Adhere sentiment on white card stock to chocolate chip card stock measuring 1 5/8" X 3 5/8" then to red card stock measuring 1 7/8 " X 3 7/8"
Adhere 2 red flowers to two chocolate chip flowers with the red flower on top
Adhere 1 chocolate chip flower to red flower with chocolate chip flower on top
Adhere gems to center of flowers
Adhere red looped matted piece to right corner of card leaving 1/8" in from edges making sure the side with the loops 1/4" from edge is facing the right edge of the card (see card)
Adhere white polka dot card stock matted to chocolate chip card stock and line up to the middle of the red trim loops as shown on card
Adhere chocolate looped matted piece to bottom left corner of card leaving 1/8" in from edges making sure the side with the loops 1/4" from edge is facing the left bottom edge of the card (see card)
Adhere CakeBella matted card stock to top left corner of card leaving 1/8" in from edges
Adhere sentiment matted card stock to bottom right corner of card leaving 1/8" in from edges
Add flowers and center to polka dot embossed card stock starting with one flower that has the red flower on top then the flower with chocolate chip on top and finally the last flower with the red flower on top
It's A Girl Thing

Card 5' X 7"
Stamping Bella -Cosmobella
Stamping Bella - It's A Girl Thing
Stampin Up Well Scripted - Happy Birthday
DCWV Sorbet Stack Designer Paper
Memento Ink - Tuxedo Black
Brads
Copic Markers
Designer Paper
- cut one piece at 6 3/4" X 4 3/4"
- cut one piece at 2" X 5"
Purple Card stock
- cut one piece at 2 3/4" X 4"
- cut one piece at 2 1/2" X 2 1/2"
- cut one piece at 2 1/2" X 5 1/2"
Tangerine Card stock
- cut one piece at 2 1/2" X 3 3/4"
- cut one piece at 2 1/4" X 2 1/4"
- cut one piece at 2 1/4" X 5 1/4"
Cranberry Card stock
- cut one piece at 2" X 2"
- cut one piece at 2 1/4" X 3 1/2"
White Card stock
- cut one piece at 1 3/4" X 1 3/4"
- cut one piece at 2" X 3 1/4"
Adhere largest piece of designer paper measuring 6 3/4" X 4 3/4" to card
Stamp It's A Girl Thing corner to corner (see card) onto white card stock measuring 1 3/4" X 1 3/4" - adhere to cranberry card stock measuring 2" X 2".
Adhere those two to Tangerine card stock measuring 2 1/4" X 2 1/4". Pierce edge of Tangerine card stock then adhere to Purple card stock measuring 2 1/2" X 2 1/2"
Add brads to Designer Paper measuring 2" X 5" evenly along left side then adhere to Tangerine card stock measuring 2 1/4" X 5 1/4". Pierce edge of Tangerine card stock and then adhere to Purple card stock measuring 2 1/2" X 5 1/2". Adhere on a slight angle to bottom left corner of card as shown.
Stamp Cosmobella to White card stock and colour. Mat to Cranberry card stock measuring 2 1/4" X 3 1/2" and mat those two to Tangerine card stock measuring 2 1/2" X 3 3/4". Pierce edge of Tangerine card stock then adhere to Purple card stock measuring 2 3/4" X 4".
Adhere Cosmobella to right side of card approximately 1/2" up from bottom and 1/4" in from the right edge of card
Adhere It's A Girl Thing and center between edge of left side of card and Cosmobella with the top point touching the top of the card.
Stamp Happy Birthday using Memento Ink - Tuxedo Black on designer paper as shown on card
Loopy Flower - You're Too Kind

Card 5" X 6 1/2"
Designer Paper DCWV - The Sorbet Stack
Stampin Up Whimsical Words - You're Too Kind
Stamping Bella - Loopy Flower
Sizzix Polka Dot Folder
Cuttlebug
White Card stock
Scalloped Circle Punch 2" and 1 3/4"
Circle Punch 1 1/2"
Memento Ink - Tuxedo Black
Jim Holtz Distressed Ink - blue
Copic Markers
Piercing Tool
Dimensionals
Designer Paper
- cut one at 3" X 6 1/4" (blue pattern #1)
- cut one at 3 3/4" X 4 1/2" (blue pattern #1)
- punch one piece using 2" scalloped circle punch
- cut one piece at 3 1/4" X 6 1/4" (blue and yellow pattern #2)
- cut one piece at 3 1/4" X 4" (blue and yellow pattern #2)
- cut one piece at 3" X 4 3/4" (yellow dot pattern #3)
- cut one piece at 3 1/2" X 4 1/4" (yellow dot pattern #3)
- punch one piece using 1 3/4" scalloped circle punch - pierce scallops
- cut one piece at 3" X 5" - using Polka Dot Folder run through Cuttlebug to emboss
- cut one piece at 2 3/4" X 3 1/2" - using Memento Ink stamp Loopy Flower image, colour with Copic Markers
- punch one circle using 1 1/2" circle punch - stamp You're too kind using Distressed Ink - blue
- adhere - white circle with sentiment using dimensional to yellow scalloped pierced circle, adhere them using adhesive to blue scalloped circle
- adhere - blue pattern #1 (3" X 6 1/4") to left front of card leaving 1/8" from side, top and bottom
- adhere - blue and yellow pattern #2 (3 1/4" X 6 1/4") to right front of card leaving 1/8" from side, top and bottom and overlapping blue pattern #1
- adhere white polka dot embossed paper 3/8" in from left side and 5/8" up from bottom
- adhere yellow dot pattern #3 (3" X 4 3/4") 1/2" in from right side and centered in middle of white polka dot embossed card stock
- adhere blue pattern #1 (3 3/4" X 4 1/2") centered in the middle of white and yellow dot patterned paper
- adhere yellow dot patterned paper #3 (3 1/2" X 4 1/4") centered to blue pattern paper
- adhere blue and yellow patterned paper (3 1/4" X 4") centered on yellow dot patterned paper
- adhere white card stock with coloured Loopy Flower image to center of blue and yellow patterned paper
- adhere scalloped circles and white circle with sentiment to right corner as shown on card
Springtini - Birthday

Card 5" X 6 1/2"
White Card stock
Spellbinders Nestabilities - Mega Classic Scalloped Ovals
Spellbinders Nestabilities - Blossoms
Stamping Bella - Springtini Stamp
Clear Cling - "birthday" stamp
Jim Holtz - Ranger Distressed Ink Pad - Blue
Memento Tuxedo Black Ink Pad
Sizzix Embosslits - Beautiful Wings Embossing and Die Cut Folder
Copic Markers
Sizzix Polka Dot Embossing Folder
Sizzix Damask Embossing Folder
Sizzix Small Floral Embossing Folder
Sizzix Texture Plate
Bigshot
Cuttlebug
White Card stock
- cut one piece 2 1/2" X 2 1/2" - using embosslits beautiful wings folder run through big shot for large butterfly
- cut one 4 3/4" X 6 1/4" - using sizzix texture flower place run through big shot, adhere to card
- cut one 2 1/2" X 4"
- cut one 2" X 3 3/4" - using sizzix polka dot folder run through Cuttlebug - adhere to 2 1/2" X 4" card stock and adhere both to top right corner or card as shown in picture
- cut one 3 3/4" Nestabilities blossom - using Sizzix small floral embossing folder run through Cuttlebug
- cut one 3" Nestabilities blossom - stamp Springtini image using Memento ink pad and colour with Copic markers
- Adhere two cut blossoms together using dimensionals - adhere to card as shown
- cut one 1 1/2" X 3 1/4" oval Nestabilities - using Damask embossing folder run through Cuttlebug
- cut one smallest oval - stamp "birthday" sentiment using Distressed Ink blue, adhere to card on bottom right corner
- Adhere butterfly to top right corner of card as shown in picture
Fairy Silhouette

Card 5" X 6 1/2"
Cricut
Cricut Cartridge - Calligraphy Collection
Silver dot embellishments (5) - Michaels
Sizzix Polka Dot Folder
Cuttlebug
Silhouette - computer generated on Microsoft Office Word
White Card stock
Black Card stock
EK Border Punch
White Card stock
- cut one piece at 1 3/4" X 2 1/2" - cut around image after silhouette printed
- cut one piece at 3 1/4" X 4" - run through Cuttlebug with Sizzix Polka dot folder to emboss
- cut one piece at 2" X 2 3/4" - mat to silhouette image
- cut one piece 2" X 6 1/2" - punch using EK border punch - adhere to top of card 3/8" from top
Cut two images from Cricut Calligraphy Collection - image page 80 of booklet using Gratitude key "no shift". Cut at 2"
Adhere to bottom left and right corners of card.
Add three silver dot embellishments to border as shown
Add a silver dot embellishment to each 2" image as shown on card
Happy Birthday

Card 5" X 6 1/2"
Old Olive Card stock
Certainly Celery Card stock
Sizzix Polka Dot Embossing folder
Cuttlebug
Stampin Up Stamps - Delight in Life (Flower)
- Happy Everything (Birthday and Happy)
1/4" ribbon - green
Old Olive Ink Pad
Versamark Ink Pad
Stampin Up Rhinestone brad
We R Memory Keeper Big Bite
Piercing tool
White card stock
- cut one piece at 2" X 2"
- cut one piece at 2 1/4" X 3 1/4"
- cut one piece at 1 3/4" X 5/8"
- cut one piece at 2 1/2" X 6 1/2"
Adhere to card approximately 3/8" from top of card
Stamp flower using Old Olive ink onto center of white card stock, pierce middle of flower and add rhinestone brad
Stamp "happy" 3 times on large Old Olive card stock piece using Versamark ink pad, as shown on card
Center both white card stock with flower stamp and Old Olive card stock stamped 3 times with happy on polka dot embossed card stock and adhere to card
Stamp birthday onto small Old Olive card stock piece using Versamark ink pad and punch 3/16 hole at one end using Big Bite
Wrap ribbon around card twice, attach birthday sentiment to ribbon and tie knot
Old World - Note Card, Envelope and Stationary Box

Here is the finished product including the Stationary Box. I'm hoping to add the step by step instructions for the Stationay Box to my blog in the future. For now, I have provided the site where I purchased it from.
For the Stationary Box please visit http://www.butternutsagedesigns.blogspot.com/
(P.S. - she charges a $3.00 fee)
See below for all instructions on note cards and envelopes.
Old World - Note Card & Envelope

White Card stock
Old World Designer Paper from DCWV
Pearl Strings (Purchased 5 yards in container - pearls on string)
Ribbon 1/4"
Clear Cling Border Stamp
Stampin Up Perfect Plum Ink Pad
Sizzix Embossing Folder
Cuttlebug
Stampin Up crystal effects (or any other clear adhesive to adhere sting of pearls to each card)
White Card Stock
- cut 6 at 4" X 5 1/4"
- cut 6 at 1 1/4" X 4"
Adhere all designer papers to 1 1/4" top part of each note card.
Adhere string of pearls to each note card cutting string to fit width of note card - wait until adhesive is dry
Tie ribbon around top of note card just above string of pearls
Stamp bottom of each note card with border stamp and perfect plum ink
Stamp bottom of each flap of envelope with border stamp and perfect plum ink
Old World - Music Card

Card 5" X 7"
Crumb Cake Card stock
DCWV Old World Designer Paper
Moss Green Card stock
Spellbinders Nestabilities Blossom - 3 3/4", 3 1/8" and 2 1/2"
Big Shot
Hero Arts Clings - Music Background
Ribbon
Sponge Dauber
1 Heart embellishment
StazOn - Timber Brown Ink pad
Dimensionals
Crumb Cake Card stock
- cut one piece 6 1/2" X 2 1/4"
- cut one piece 3" X 4 1/4"
- using the 3 3/4" blossom
Old World Designer Paper
- cut one piece 4 3/4" X 6 3/4"
- cut one piece 2" X 6 1/4"
- cut one piece 2 3/4" X 4"
- using the 3 1/8" blossom cut one
- Using Scriptina Font
- Brown for colour ink
- Font size set at 8
- Center the printing and type as follows
To Sing
Always Find A
Song
Using the 2 1/2" blossom center on sentiment and run through Big Shot
Using sponge dauber and StazOn - Timber brown ink, sponge around all piece including card itself
Tie ribbon around 6 3/4" X 4 3/4" designer paper and adhere to card
Adhere 6 1/2" X 2 1/4" crumb cake card stock to 6 1/4" X 2" designer paper - then adhere to card approximately 1" up from bottom of card
Stamp music background onto designer paper measuring 2 3/4" X 4"
Adhere stamped designer paper to crumb cake card stock measuring 3" X 4 1/4" then adhere to card 5/8" in from right edge of card and 1/4" up from bottom of card
Adhere all blossoms together matching scallops using dimensionals
Adhere heart embellishment
Old World - Card and Envelope
White Cardstock
Crumb Cake Cardstock - Stampin Up
DCWV - Premium Stacks, The Old World - paper #1 (2 pieces)
K & Co. Designer Paper - paper #2
Clear Cling Stamps - Butterfly and "thinking of you" sentiment
EK Real Estate Punch and border punch
Round Corner Punch
Crumb Cake Classic Ink
Sponge Dauber
3 Pearl heart embellishments
Dimensionals
Cut white cardstock 4 1/4" X 11 1/4" score at 5 1/8" along long side - fold
Cut Crumb Cake Cardstock at 4 1/4" X 5 1/8" - Adhere to front of card
Cut designer paper #1 at 3 1/2" X 4" and punch corners with round corner punch
Cut designer paper #2 at 1 1/2" X 4" and punch corners with round corner punch
Space evenly on front of card as shown - adhere papers to card
Stamp sentiment on crumb cake card stock and punch out using Real Estate Punch
Using sponge dauber and crumb cake ink, sponge around edge of real estate and sentiment tag
Using Crumb Cake ink stamp a butterfly near the top and again near the bottom of designer paper #2 as shown on card.
Adhere Real Estate tag with sentiment to center of designer paper #1 as shown on card using dimensionals
Add all three pearl heart embellishments as shown on card.
Using border punch and designer paper #1 - punch out border and adhere to just inside envelope as shown in picture above
Using sponge dauber, sponge crumb crumb cake ink around edges of card
Note Card and Matching Envelope Cover

White cardstock
Ribbon
3 blue floral embellishments
Big Shot
Jim Holtz Alterations Tattered Florals Die - use smallest flower on die (cut 3 using white cardstock)
3 Blue Brads
Piercing Tool
Cuttlebug
Cuttlebug embossing strip - "with love"
Cut one piece of white cardstock measuring 7" X 12" - score as follows
- 1 1/4", 6" and 10 3/4"
Fold at score lines
Slide embossing trip on the right side of front side of card just above 1 1/4" crease. Run through Cuttlebug to emboss. See picture above.
Fold in each end at the 1 1/4". Using 1/4" double sided tape - adhere at top and bottom along each edge of flap forming pocket for cards to slip in as shown in picture below.
Pierce all flowers in the center with piercing tool
Take 1 brad and one each of a white flower and blue flower. Secure flowers together with brads - repeat for all three flowers.
Using dimensionals add to clover as shown
Tie ribbon around entire cover creating a bow just to the right below the flowers and above the embossing.

Your opened note card cover with 2 notes and 2 envelopes tucked in each pocket.
All 4 Note Cards with Matching Envelopes

See cards below with step by step instructions to make these lovely blue and white note cards.

Envelopes 5 3/4" X 4 3/8"
Stampin Up Scalloped Punch
Choose two designer papers that match your card
cut one at 4 1/4" X 5 5/8"
cut the second paper at 2" X 5 1/4" - use scallop punch to scallop one side of this paper
Adhere and center the scalloped paper 1/4" down from the edge of the 5 5/8" side of the larger piece of designer paper
Add adhesive to the back of the two designer papers and slip inside the envelope. Press to ensure the papers adhere.

Envelope used is 5 3/4" X 4 3/8"
Cuttlebug
Cuttlebug embossing strip - "with love"
Open envelope with front of envelope facing up with point of the flap pointing towards your body
Slip envelope flap into embossing strip. Slide the embossing strip so that it is just below the flap crease
Run through the Cuttlebug - bottom of front side of envelope first
Plate A then plate B then envelope and embossing strip then plate B
Blue and White Card #2

White Cardstock
Stampin Up Patterns Pack III - Designer Paper (choose three papers)
Ribbon
Brad
Big Shot
Jim Holtz - Tattered Florals Bigz Die
Blue Paper Flower
Dimensional
Adhesive
Bone Folder
White Cardstock
- cut one piece at 4 1/4" X 11" - score at 5 1/2" along long side and fold using bone folder
- cut one piece at 1 1/2" X 5 1/2"
- cut one piece at 3 1/4" X 3 1/4"
- cut one piece at 1 1/2" X 1 1/2" place over flower on top left of Tattered Floral die and run through Big Shot
- Paper #1 cut at 4" X 5 1/4"
- Paper #2 cut at 1 1/4" X 5 1/4" tie ribbon around paper as shown in picture
- Paper #3 cut at 3" X 3"
Adhere Designer Paper #2 with tied ribbon to white cardstock measuring 1 1/2" X 5 1/2"
Adhere Designer Paper #3 to white cardstock measuring 3 1/4" X 3 1/4"
Pierce holes through both flowers and add brad.
Adhere flowers to Designer Papers #3 using dimensional
Adhere Designer Papers #2 to card as shown
Adhere Designer Papers #3 to card as shown
Blue and White

White Cardstock
Stampin Up Patterns Pack III - Designer Paper (choose three papers)
Ribbon
Brad
Big Shot
Jim Holtz - Tattered Florals Bigz Die
Blue Paper Flower
Dimensional
Adhesive
Bone Folder
White Cardstock
- cut one piece at 4 1/4" X 11" - score at 5 1/2" along long side and fold using bone folder
- cut one piece at 1 1/2" X 5 1/2"
- cut one piece at 3 1/4" X 3 1/4"
- cut one piece at 2 1/4" X 2 1/4" place over flower on bottom right of Tattered Floral die and run through Big Shot
- Paper #1 cut at 4" X 5 1/4"
- Paper #2 cut at 1 1/4" X 5 1/4" tie ribbon around paper as shown in picture
- Paper #3 cut at 3" X 3"
Adhere Designer Paper #2 with tied ribbon to white cardstock measuring 1 1/2" X 5 1/2"
Adhere Designer Paper #3 to white cardstock measuring 3 1/4" X 3 1/4"
Pierce holes through both flowers and add brad.
Adhere flowers to Designer Papers #3 using dimensional
Adhere Designer Papers #2 to card as shown
Adhere Designer Papers #3 to card as shown
Thank You

White Card 5" X 6 1/2"
Stampin Up Patterns Pack III
Stampin Up Short & Sweet - Thank you sentiment
Stampin Up Crumb Cake Classic Ink
White Cardstock
3 Brads
Stampin Up 1 3/8" circle punch
Stampin Up 1 1/4" circle punch
Clear stamp - flower
Ribbon
Adhesive
Dimensionals
Patterns Pack III - choose 3 different Designer Papers and one solid colour (4 total)
- Cut Designer Paper #1 at 4 1/2" X 6"
- Cut Designer Paper #2 at 2 1/4" X 5"
- Cut Designer Paper #3 at 2" X 4"
- Cut solid colour paper for mats - 1 at 2 1/2' x 5 1/4" and 1 at 2 1/4" X 4 1/4"
- Punch 3 circles with the 1 1/4" punch
- Cut one piece at 5/8" X 2" stamp sentiment
- Punch 3 circles with the 1 3/8" punch
- Cut one piece at 3/4" X 2 1/8"
Adhere white circles to coloured circles and using dimensionals adhere flowers to middle of circles
Stamp sentiment to white cardstock measuring 5/8" X 2"
Adhere white cardstock with sentiment to solid coloured paper measuring 3/4" X 2 1/8"
Adhere Designer Paper #1 to card
Adhere Designer Paper #2 to solid coloured paper measuring 2 1/2' x 5 1/4"
Adhere Designer Paper #3 to solid coloured paper measuring 2 1/4" X 4 1/4" - tie ribbon to one end
Adhere paper with ribbon to card as shown
Adhere Designer Paper #2 to card as shown then using dimensionals add circles with flowers and brads attached as shown
Add sentiment to card as shown
You're Special

Flower - Clear Stamp
Stampin Up Old Olive Classic Ink
Stampin Up Pattern Pak III - choose 2 co ordinating designer papers
Ribbon
3 Brads
Stampin Up Old Olive Cardstock
White Cardstock
Sentiment Tag
Dimensionals
White Cardstock
- cut three at 1 1/4" X 1 1/4"
Old Olive Cardstock
- cut three at 1 1/2" X 1 1/2"
- cut one at 3 1/2" X 5"
- cut one at 6 1/2" X 10" score at 5" along long side fold - use bone folder to crease
Designer Patterned Paper #1
- cut one at 4 1/2" X 6"
Designer Patterned Paper #2
- cut one at 1 1/2" X 4 3/4"
Adhere Designer Patterned Paper #1 to card
Adhere Old Olive cardstock measuring 3 1/2" X 5" to card centered over Designer Patterned Paper #1
Stamp image off center on all three white cardstock squares and add brads to center of flowers
Adhere white stamped squares to all three Old Olive squares
Tie ribbon around Designer Patterned Paper #2
Adhere three squares (using dimensionals) and Designer Patterned Paper #2 centering evenly on Old Olive cardstock on card
Adhere sentiment tag
Thank You

Card 5" X 6 1/2"
Cuttlebug
Spellbinders Impressabilities - Flower Silhouette
Brayer
Stampin Up - Curly Cute, Thank You sentiment
Stampin Up Crumb Cake Classic Ink Pad
Stampin Up Crumb Cake Cardstock
White Cardstock
Stampin Up 2" Scalloped Circle Punch
Fiskars Oval Scalloped Punch
Rhinestones
Dimensionals
Stampin Up crystal effects
Crumb Cake Cardstock
- cut one piece at 4 3/4" X 6 1/4"
- punch one 2" scalloped circle
- cut one piece at 5 1/2" X 4 1/4"
- punch once scalloped circle - stamp Thank You (or any sentiment) using crumb cake ink
Carefully lay white cardstock measuring 5 1/2" X 4 1/4" on top of Flower Silhouette Impressabilities prepare to run through Cuttlebug as follows:
A plate, then B plate, then Impressabilities with cardstock on top and then B plate.
When ink is dry cut brayered cardstock in half.
Using dimensionals adhere sentiment oval to crumb cake scalloped circle.
Adhere Crumb Cake cardstock to card.
Adhere two pieces of brayered cardstock on Crumb Cake cardstock as shown on card. Be sure pattern matches at center.
Adhere scalloped circle and oval circle to card.
Adhere rhinestones to card as shown using crystal effects.
LOVE - My Valentine's Card To "My" Valentine
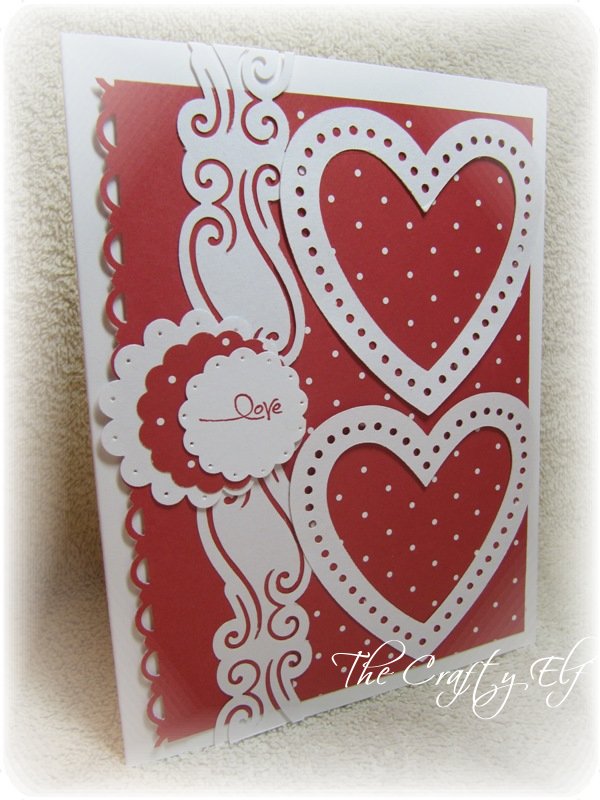
Card 5" X 6 1/2"
Stampin Up Designer Paper
Stampin Up Scalloped Border Punch
EK Border Punch (White Scalloped Border)
Cricut
Cricut Wild Card Cartridge
Stampin Up - Short and Sweet - Love Much (taped off much)
Stampin Up - Piercing Tool
Stampin Up Real Red Stamp Pad - Classic
Adhesive
Designer Paper
- cut one at 1 1/2" X 6" - punch solid paper, one side with Scalloped Border Punch
- cut one at 3" X 6" (polka dot designer paper)
- Punch 1 scalloped circle 1 1/2 " using the polka dot designer paper
White Card Stock
- Cut two hearts from using the Cricut and Wild Card Cricut cartridge - heart
- Punch one scalloped circle at 1 3/4" and one at 1 1/4"
- Cut one piece of cardstock at 1 1/2" X 6 1/2" and use EK Border Punch
Stamp sentiment on smallest scalloped circle (tape off the word much on stamp - I used painters tape over the word much and used Real Red Ink Pad from Stampin Up)
Pierce all white scalloped circles with Stampin Up Piercing tool
Adhere Designer Paper to card
Adhere White card stock fancy border along seam of Designer Paper
Add 2 hearts to Polka Dot Designer paper as shown
Adhere three scalloped circles left to right starting with largest to smallest as shown on card

Big Shot
Spellbinders Impressabilities - Flower Silhouette
Stampin Up Large Scalloped Circle Punch 3"
Circle Punch 2 1/2"
Sentiment - Precious and few are friends like you (or sentiment of your choice)
Stampin Up - Crumb Cake Ink Pad
4 small round pearl embellishments
1 heart shaped pearl embellishment
Piercing tool
Designer Paper
White card stock
Designer Paper
- cut one at 4 3/4" X 6 1/4"
- cut one at 3 1/2" X 3 1/2"
- cut one using large scalloped 3" circle punch
- cut one at 6" X 4 1/2"
- cut one at 3 1/4" X 3 1/4"
- stamp sentiment on white card stock punch out evenly using 2 1/2" circle punch
Adhere white card stock measuring at 3 1/4" X 3 1/4" to Designer Paper square cut at 3 1/2" X 3 1/2"
Run white card stock measuring 6" X 4 1/2" through Big Shot with Flower Silhouette Impressabilities
Adhere embossed white card stock to Designer Paper measuring 4 3/4" X 6 1/4". Adhere these to
card.
Adhere scalloped circle sentiment to squares and then adhere those to card.
Embellish with pearls as shown
Apple

Big Shot
- Spellbinders Blossom Nestabilities
- Doodlecharms Cartridge - Apple
- Sizzix Polka Dot Embossing Folder
White ribbon
Stampin Up Dimensionals
Real Red cardstock
- Cut one piece 6 1/2" X 10" score along long side at 5"
- Cut one piece 4 3/4" X 3 3/4"
- Cut one piece 4 1/4" X 5 1/2" - run through Cuttlebug with Polka Dot Embossing Folder
- Cut one piece 4" X 4" and run through Big Shot with Blossom Nestabilities - run Blossom through Cuttlebug with Polka Dot Embossing Folder
Cut one apple out with real red cardstock using shift key (only the apple is used)
Cut one apple out with chocolate chip cardstock using shift key (only the stem is used)
Adhere real red apple part and chocolate chip stem to green apple
Adhere apple to embossed blossom
Tie ribbon around real red cardstock
Attach apple and blossom to real red cardstock
Attach white embossed cardstock to real read card
Attach real red /ribbon, blossom and apple piece to white embossed cardstock
A Card Of Joy

Cricut,
Opposites Attract cartridge (joy sentiment),
Stampin Up Scalloped Border Punch
Jim Holtz Alterations - Tattered Florals
Stampin Up - Peach Parfait
Rose, Yellow and Green card stock
K & Co. Berry Sweet Designer Paper
Rhinestones, adhesive and dimensionals
Rose coloured Card stock
- cut one piece at 7" X 10" - scored at 5" along the 10" side
- cut one piece at 1 1/4" X 6 3/4" - scallop punch both sides
- cut one piece at 5 1/4" X 5 3/4" run through Big Shot with Tattered Floral Die
- cut one piece at 4 3/4" X 6 3/4" - use to mat designer paper
- cut one piece at 5 1/4" X 5 3/4" run through Big Shot with Tattered Floral Die
- cut one piece at 5 1/4" X 5 3/4" run through Big Shot with Tattered Floral Die
- Cut one piece 4" X 4" and cut the word "joy" from the Opposites Attract cartridge using your cricut machine
- cut one piece 4 1/2" X 6 1/2" - mat to Peach Parfait card stock measuring 4 3/4" X 6 3/4"
Cut smallest green flower in half and use as leaves
Adhere Peach Parfait card stock to folded card front
Adhere K & Co. Designer paper to Peach Parfait card stock - on card
Adhere the following using dimensionals to give depth to each flower as follows
- smallest flower in rose colour - adhere to
- Peach Parfait flower second to smallest size
- Adhere the two pieces of the smallest green flower cut in half to each side of flower (as shown on card)
- smallest Peach Parfait flower - adhere to
- Rose coloured flower with thinnest petals - adhere to
- Largest Peach Parfait flower
- Adhere one half of the larger green petals to form leaves on flower (as shown on card)
- Adhere second to smallest Rose coloured flower to largest Peach Parfait flower
- Adhere the other half of the green petals to form leaves on this flower
- Adhere sentiment to top middle of flower
Adhere the scalloped strip to card approximately 1 1/2" up from bottom of card
Using dimensionals adhere flowers to card (as shown)
Tri Fold - Triple Blossom Frame Card


Big Shot or Cuttlebug (I used Big Shot)
Chocolate Chip Paper
Designer Paper
- Pink
- Pink and Brown
StazOn Ink - Timber Brown
Spellbinders Nestabilites - Blossom (all six dies)
Stampin Up Chocolate Chip cut one at 5" X 10"
Score at 2 1/2" and 7 1/2 " fold on score lines using bone folder
Designer Paper (Pink)
- Cut 4 pieces at 2 1/4" X 4 3/4"
- Cut one piece at 4 3/4" X 4 3/4"
- Using 2 largest dies place one inside the other lining up scallops run through Big Shot
- Using 2 middle size dies place one inside the other lining up scallops run through Big Shot
- Using 2 smallest dies place one inside the other lining up scallops run through Big Shot
- 2 at 2 1/4" X 4 3/4" adhere to two front panels of card as shown above
- 2 at 2 1/4" X 4 3/4" adhere to two inside panels of card on left and right as shown above
- 1 at 4 3/4" X 4 3/4" adhere to inside middle of card as shown above
are in the center of the card as shown above AND if you have a look at the first picture above you will
notice that on each scallop there is a point at the bottom inside of the scallop touching the center of the card.
This just keeps the scallops all lined up exactly the same for consistency. You will now know where to adhere them on the card.
Now, remove the the two inner scallops. Take the largest scallop flip over and add adhesive to ONLY the left side of the scallop then adhere to the card. This leaves the right side free to open.
Now take the middle size scallop and line up inside the larger scallop. When your happy with the way
it is lined up, flip it over and put adhesive on scallop on ONLY the right side and adhere to card.
Lastly, take the smallest scallop and line it up inside the other two scallops on the card. When your happy with how it is lined up add adhesive to the scallop ONLY on the left side. Adhere to the card.
Open and close your card and you will see how the scallops fit one inside the other.
Add your sentiment to the front of the card and add the butterfly to the inside top right corner of the
middle of the card.
Thanks

Stamps: Delight In Life - Stampin Up
Paper: Stampin Up Old Olive, Stampin Up Patterns Pak III
Ink: Stampin Up - Old Olive
Accessories: Stampin Up - Rhinestone, green ribbon, Cricut and Opposites Attract Cricut Cartridge
1 white card 5" X 6 1/2"
Cut one piece of ribbon at 4"
Cut one piece of ribbon at 3"
Cut 3 patterned paper squares at 1 1/2" X 1 1/2"
Cut 3 white card stock squares at 1 3/4" X 1 3/4"
Cut 3 old olive paper squares at 2" X 2"
Cut 1 piece of old olive card stock at 1/8" X 3 1/2"
Cut sentiment "thanks" from Opposites Attract Cricut cartridge
Stamp solid flower from "Delight In Life" stamp set
Stamp small flower from "Delight In Life" stamp set
Hand trim both flowers
Adhere 1 patterned paper square to 1 white card stock square and then
adhere two squares to one old olive square.
Repeat for the remaining two sets of squares.
Adhere large flower to one set of squares at middle
Adhere 4" ribbon over top of large flower and around to back of the set of squares
Fold 3" ribbon in half and adhere under large flower and wrapped around ribbon
as shown, adjust and trim ends on angle
Adhere small flower
Add rhinestone
Adhere the 3 squares to card as shown
Adhere sentiment and line as shown
Feather Boa

Stamps: Feather Boa stamp, Sentiment "Believe That you are Wonderful" stamp - Lili Of The Valley
Paper: White Card Stock. Purple Card Stock
Ink: Memento Stamp Pad - Tuxedo Black, combination of Stampin Up Brocade Blue and Lovely Lilac
Accessories: Spellbinders Blossom Nestabilities,Stampin Up Dazzling Diamonds, Stampin Up Crystal Effects, embellishments (gems), ribbon, scalloped circle and circle punches, copic markers, Sizzix polka dot embossing folder,
Cricut machine and Cricut Wild Card Cartridge, piercing tool
Using Spellbinders Blossom Nestabilities largest die - cut one on copic paper
Stamp Feather Boa image on blossom cut copic paper and colour with copic markers and add Dazzling Diamonds to Boa
Using white cardstock blossom with stamped image as a template, cut 1 piece of purple cardstock 1/8 " larger
Cut 1 Card (white card stock) 5" - Cricut Wild Card Cartridge "Scallop" and cut one using blackout - purple card stock
Emboss white card with Sizzix Polka Dot Embossing Folder - fold top in half to form easel
Cut purple cardstock card in half and line up to bottom of card and adhere to bottom of white embossed card as shown in picture
Wrap ribbon around bottom of card and form bow.
Stamp sentiment on white cardstock using combination of Brocade Blue and Lovely Lilac ink
Punch out sentiment using 1 3/4" circle punch
Punch out scalloped circle in purple using 2" scallop circle punch, pierce with piercing tool along scallop
Punch out white circle at 2 1/2 " circle
Using dimensionals adhere stamped sentiment to purple pierced scalloped circle
Attach sentiment and scalloped circle to 2 1/2"punched white circle
Attach to bottom of card
Attach image coloured with copic markers to purple hand cut scallop
Attach coloured piece and hand cut purple scallop to front of card - adhere to lower half of front of card
Add gem embellishments to card as shown in picture
By The River

Stamps: By The River - Lili of The Valley
Paper: Stampin Up Real Red, Old Olive, Recollections Blue and White Card stock
Ink: Memento Tuxedo Black, Stampin Up Crumb Cake and Copic Markers
Accessories: Buttons, Stampin Up Piercing tool, Martha Stewart Border Punch,
Stampin Up Large Scallop Punch and Circle Punches 1 1/2", 2", 2 1/2", Jute Twine, Sizzix Polka Dot Embossing Folder and Cuttlebug
Kraft (brown paper bag colour) envelopes purchased from Michaels
White Card stock for image is 2 3/4" X 3 1/2"
White Card stock 1 1/2" circle punch used to punch out sentiment "Believe in Your Dreams"
Sentiment was stamped using Stampin Up Crumb Cake
Stamp image using Memento Black Tuxedo Ink and colour with copic markers
Real Red Paper
- On piece cut at 2 1/2" X 3 - run through Cuttlebug with Sizzix Polka Dot Folder
- 2" circle punched out - run through Cuttlebug
- Cut 1 piece 2 1/2" X 5 1/4"
- 2 1/2" circle punched out
- 3" scalloped circle punched out and pierced with piercing tool along scallops
- Cut one piece 2" X 6 3/4" - used Martha Stewart Loop border punch
Tie jute twine around card twice and knot
Gone Fishing

Stamps: Gone Fishing and Circular Sentiments - Lili of the Valley
Paper: K & Co. Designer Paper, Certainly Celery paper from Stampin Up
and Recollections Light Blue from Michaels
Ink: Stampin Up Crumb Cake, Copic Markers
Accessories: Buttons, ribbon, scalloped punch and round punches and Stampin Up Crystal Effects
Lili of the Valley Stamped image
- Memento Ink - Tuxedo Black
- Copic Markers YG95,B0000,B00.E31,E33,E99,C1,B24
- Round punches, 1 1/2" (stamped image using crumb cake ink), 2"(certainly celery) and scalloped 1 3/4"(light blue)
Buttons 5 small used crystal effects to adhere to card
Dimensional between stamped image and light blue scalloped circle
Paper
- Light Blue 3' X 3 3/4"
- Striped 2" X 3 1/2"
- Polka Dot 3" X 4 3/4"
- Certainly Celery 3 1/4" X 4", 2 1/4" X 3 3/4", 3 1/4" X 5"
Retirement Card

Stamps: SU Well Scripted - Congratulations
Paper: Avery 03251 Half-Fold Card with rich texture and torn edge and black CS
Ink: Memento - Tuxedo Black
Accessories: Pearl Embellishments, Spellbinders scalloped ovals, Cuttlebug embossing folder and dimensionals and Stampin Up Crystal Effects
I used a second Half Fold Card and cut pieces as follows
- 4 1/8" X 5 3/8" ran through Cuttlebug with Cuttlebug embossing folder
- 4 1/4" X 2 1/8" Spellbinders scalloped oval die - stamp Congratulations, use 4 dimensionals to adhere to black scalloped oval
Black Card stock cut as follows
- 5" X 6 3/8"
- 5 1/4" X 2 3/4" Spellbinders scalloped oval die
Add all pieces together according to picture above.
 |
Card 5" X 7"
Stampin Up Real Red Card Stock
Cut as follows
Black Card Stock
Cut as follows
Stampin Up Crumb Cake
Jute twine - cut a 19" piece
Sizzix Embosslits Scalloped Heart of Hearts - 3 red hearts
Crumb Cake - Cut freehand 3 hearts at 1/8" bigger than red hearts
Below is the instructions for the Jute Twine Bow
|

Hold ribbon as shown
with first and second fingers
approximately 2 inches apart

Continue to wrap jute
around fingers

When you have wrapped the
jute around your fingers 3
times (as shown) gently slide off fingers
your twine should
look like this

Holding firmly onto the loops
take the end of the jute and
hold it out to the side as
shown. 

Take the jute and place it over the loops
as shown. Wrap around loops
twice

Your jute should now look like this.
 |
| Tie the two ends in a knot and your bow is now done |

 |
Card 6 1/2" X 5"
Pink Designer Paper cut at 6 1/4" X 4 3/4"
White card stock cut at 6" X 4 1/2" Embossed with Sizzix
Polka Dot Embossing Folder
Sizzix Embosslits Scalloped Heart of Hearts - cut 3
Freehand - cut 1 heart 1/8" larger than scalloped heart
Cut heart according to size of card
Green dots - make holes for ribbon and weave ribbon around heart
Orange and Blue lines - start from either side and follow pattern
to make 3 lines all going in one direction from one side to the
other.
Then, start on opposite side and do the same only this time
when crossing lines go over the first ribbon and under the
second etc. creating the weave.
Make bow for heart and follow jute instructions above.
When securing bow onto heart poke ends of bow through
top of hole and secure on back with tape to hold bow in place
Adhere Pink Designer paper freehand cut heart to one scalloped heart
Adhere Designer Paper to Embossed white card stock and adhere both to card
Adhere ribbon weaved heart to card and place scalloped hearts between ribbons as
shown in picture above. Adhere heart with designer paper attached to card.
|
******************************
January 16, 2011

Heart of Knots
Card - 6 1/2" X 5"
Designer Paper cut at 6 1/4" X 4 3/4"
White card stock 6" X 4 1/2"
Tacky glue
Heart shaped template
pencil
1/4" ribbon
For this card I used a stock 6 1/2" X 5" card
Matted it with pink Designer Paper 6 1/4" X 4 3/4"
Matted the pink designer paper with white card stock 6" X 4 1/2"
Embossed white card stock with sizzix polka dot folder
Cut out a heart template and traced it lightly on embossed white card stock
Rose ribbon 1/4 width
Tied knots and cut ribbon close to knot
Used tacky glue and followed the line of the heart on the white card stock with glue
Used craft tweezers to help place knots on glue
***********************************
January 14, 2011
 |
| Dream |
Paper: K and Co. DP, Kraft Card 7 X 5
Accessories: Martha Stewart border punch, Offray ribbon.
EK Large Scalloped punch, Spellbinders Nestabilities Blossom,
Stampin Up Circle Punch, Dream embellishment
**************************************
January 10, 2011
Today I thought I would post a few more cards that I made up for Valentines Day. If you would like any more information regarding any of these cards just let me know. Enjoy


***************************************
January 9, 2011
I am excited to show you two Valentines cards I made today.
If you would like more information on
this card please send a comment.
Below each picture I've listed all the
items used and needed to make each card.
Enjoy!
Valentines Day Cards
 |
| Love
To make this card I used the following items
|
 |
| Valentines Retro Card - Love
To make this card I used the following items
*All items may be purchased at your local craft store - watch for coupons of 40% and 50% off
************************************************* |
 I love this figure skating stamp. I was a figure skater and so was my daughter. To skate...you must believe! That was my inspiration for this card. |
Stamps: Stampin Up - Elegant Ice
Paper: Brocade Blue, Black
and White Card stock
Ink: Black StazOn, Brocade Blue,
Bashful Blue and Color Box Silver, White Pen Touch
Accessories: 1, 1 1/4, 1 1/2 circle punch, dimensionals,
sponge daubers, Transparent copy paper
|
 My inspiration for this card was shoes....love them! |
Stamps: Hero Arts, Happy Birthday, Flourish
Paper: Avery Half Fold Feather Edge,Cream Card stock, DP, Scrap Pak,
Ink: Versa Magic Perfect Plumeria
Accessories: Brads and Dimensionals, Ribbon, Crystal Effects
|
 |
Flourish
Stampin Up - Delightful Decorations Stamps
3/4 inch circle punch
Crumb cake and white card stock
1" scallop punch and piercing tool
|
 |
Seasons Greetings
Stampin Up - Welcome Greetings
Scribble Tree from the Old Island Stamp Co.
Crumb cake ink
1/4 inch ribbon
Jim Holtz - Blending tool
|
 |
This is a Gift Card holder
Paper: Old Olive, Stampin Up Patter Pack III,
White Card Stock
Ink: Old Olive, Real Red
Accessories: Sponge Dauber, Magnets
for closure,
dimensional, K & Company Layer Accents,
Stampin Up Punch, Cuttlebug Polka Dot Embossing Folder,
Score Pal
Stamps: Delta Creative Rubber Stampede
|
 |
Winter Bough with ornaments
Penny Black - winter bough
Stampin Up - Seasons Greetings Curly Cute
Stampin up ornament punch
Crumb cake card stock
White card stock
Sponge dauber
Stickles
|
 |
Very Merry
Copic Markers
Whiff of Joy stamp
Stampin Up - Short and Sweet, Very Merry
Stampin Up Real Red ink
Memento Ink Pad - Tuxedo Black
Stampin Up - Pattern Pak III
Best Occasions card stock
X-press card stock
1/4 inch organza ribbon
|
 This was my first digital stamp. I must say it was a lot easier to do than I thought it was going to be. I will have to download more. Can hardly wait! |
Dottie Cupcake - Digital Stamp from
Bugaboo
Stampin Up - Well Scripted "Happy Birthday"
Oval punch, sponge dauber, Peach Parfait Ink
Atyou Spica Marker - orange
Copic Markers
DCWV - The Sorbet Stak
1/4 inch ribbon in yellow and orange
White, orange (2 shades) and yellow card stock
|
 |
Christmas Wreath
Stampin up - Curly Cute
Certainly Celery and
White card stock
Fiskars flower punch
1/4 ribbon
|

This was a card I sent to my niece Monique
in North Carolina. I had so much fun making
this card. I was thrilled to learn it was
voted a "favourite" for the week ending
December 12, 2010 on Splitcoast Stampers.
|
White on White
Sizzix embossing folder - Polka Dot
Cricit Cartridge - Christmas Cheer
used for the sleigh, presents and
sentiment
White card stock for mats
|
 |
Merry and Bright
Sizzix embossing folder -
Peppermint swirl
Crumb cake card stock
White card stock
Hero Arts - Merry
and Bright stamp
Crumb cake ink
|