Now that my wreath is all fluffed and ready for decorating, I will add a few simple items and some fishing line.
I've purchased two different pieces of greenery from the dollar store. You've probably noticed that I've shown several projects with items from the dollar store. The purpose of this is to demonstrate the possibilities of Christmas decorating. Over the years I have listened to so many people say that they could never afford or have anything that looked near as nice as some of the items they see in stores. That is simply not true! Regardless of your budget, there is no reason that your Christmas decorating or decorations can't look every bit as nice as anything you see in magazines or those fancy Christmas stores. I hope that some of what I have shown over the past month has changed peoples minds


I've purchased two different pieces of greenery from the dollar store. You've probably noticed that I've shown several projects with items from the dollar store. The purpose of this is to demonstrate the possibilities of Christmas decorating. Over the years I have listened to so many people say that they could never afford or have anything that looked near as nice as some of the items they see in stores. That is simply not true! Regardless of your budget, there is no reason that your Christmas decorating or decorations can't look every bit as nice as anything you see in magazines or those fancy Christmas stores. I hope that some of what I have shown over the past month has changed peoples minds
I'm adding a quick little video here to show how I cut apart the artificial greenery.
Now that I have cut apart the greenery I will begin.

Here is my wreath all fluffed and you can see all the greenery just at the bottom left

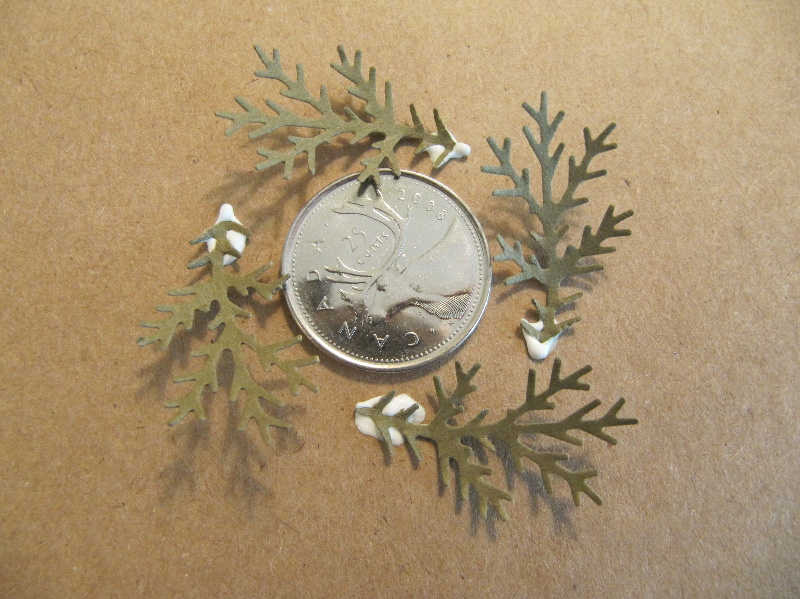
I have gone ahead and snipped several pieces of wire approximately 4 inches long. I will use these wires to attach the greenery to the wreath.
Place the wire through the greenery as shown. Wiring the greenery as shown will eliminate it from slipping out of the wire and your project

I figure out where I want to place each piece of greenery and just stick it into the wreath ready to be wired

I want to make sure I wire each piece right into the wreath for two reasons. It adds depth and ensures that the stems aren't visible once wired on

Now that the stem is wired on, I gently pull up the branches from the wreath all around the stem. Once I have added all the stems I then decide where I want to place my bow. I will spread the branches which not only gives me a visual of where the bow will be placed but also allows me to wire the bow right into the wreath.

I have some glittery wooden spun balls to add which I just love.
These were also purchased at the dollar store.

I have placed a wire through one end of the ball and will now wire it right into the wreath as I did the stems.

Remember, it is important to add your items right into your project and not on the ends of the branches.

Here is the finished wreath. I now have the option to add as much or as little as I want to the wreath depending on the look I am going for. I went for the less is more look on this one.

First let me apologize for the lighting in this picture, I tried several times. What I wanted to show here is how the wreath looks like it is hung on a wall. It is actually hanging by fishing line. I don't want to add a nail to the wall so a perfect alternative is to hang is using fishing line. I took a long piece of fishing line and ran it around the wire on the back of the wreath. Just like you would hang a charm on a necklace. I then took the two ends and tied them around a rung on my stair case. Voila, no nail holes and every one's happy!
Have you ever driven by a home and seen a wreath hanging on a door without a hanger and wondered how they did it? Here's how.
Open the door you would like to hang a wreath from. Take a thumb tack and push it into the middle of the top edge of the door until it is just flat to the door. This will only work if that piece you are trying to add the thumb tack to is wood, it will not work on metal doors.
Wrap the fishing line around the wreath as previously discussed and slip one end of the fishing line around and under the top of the thumb tack. The fishing line should slip easily under the tack. Slide the fishing line until the desired height you want the wreath to hang, is achieved. Tie the fishing line, trim the ends and close your door. I always like to slide the fishing ling around so the knot is behind the wreath and hidden.
Where ever you are in your day, I hope you are enjoying it!
Wishing you many wonderful creations!