
If you don't have time (can't run out to get wrapping paper) and don't want to spend money (who wants to spend more if you don't have too) and would like to wrap up a little gift (or a big gift), I'd like to show you how. It won't cost anything either, and that's a good thing!
Let's begin by getting 2 pieces of used tissue. Anytime there is tissue in a gift at our house, I take it and fold it up and store it away for later. It always comes in handy! So here I've decided on two sheets of used pink tissue.

Get your iron out and set it on a very low setting, one of the lowest until you figure out just how much heat you need. Very little steam as you don't want your tissue wet.

Start in a corner and make sure that the iron isn't too hot. When you have the correct heat and the iron is taking the wrinkles out of the tissue continue to iron both pieces of tissue until wrinkles are gone and paper is smooth.

Once you have ironed your tissue you will need to get your ribbon. I'm using the curly ribbon dangly stuff you can purchase at the dollar store. If your ribbon is super wrinkled or looking a little tired (mine was) you may either steam it using a kettle or regular steamer. I happen to have a clothing steamer so I will be using this.

Holding the ribbon a safe distance away from the steam, begin to steam your ribbon and you will see the bends and wrinkles fall out.

On this particular bow I will be taking off the clear plastic sticky piece. I just pull it away from the bow and it becomes unattached.

I need to then remove the staple and tape holding the ribbon together

Now that we have prepared everything let's begin to wrap.

I have a book about 6" X 7" that I'm going to wrap so I cut both pieces of tissue approx. 20" X 20" square and they are now one on top of the other. I'll be wrapping using both pieces together.


I Bring up the left corner (or right doesn't matter) to meet at the top.

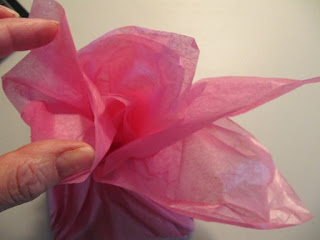
I'll bring up the last corner so I'm now holding all four corners. Note how the sides are all sticking out?It almost looks as though you see and "H". Each one of those pieces sticking out will need to be tucked inwards. Look at the bottom right corner that's sticking out. I will begin by gently easing that piece in towards the middle of the gift all the while holding the top corners. I tuck it in as if it popped out and I need to put it back. It's easier than you think! I repeat for all remaining corners.

Once all the corners are tucked in I gently grab the tissue as close to the the gift as possible being careful not to pull too hard as the tissue may tear at the corners.


I will now tie three (3) more pieces of curly ribbon on the gift and begin to embellish.

Here is where you may get creative. You may decorate your gift with almost anything but I'm going to grab my paper scraps I had previously cut and never used (I keep these in a zip lock bag, perfect for this) it makes the wrapping go so much quicker. I chose a piece of leftover loopy border and cut it in half. I then took my scissors and snipped apart two loops.


Here is the finished product. I wanted to show you how easily you can wrap a gift using some recycled tissue a recycled bow and some left over scraps. It makes a lovely wrapping for your gift.
The possibilities are endless and with a little imagination you can turn your wrapping into a work of art at no cost. It's your turn...go ahead and suprise someone with one of your lovely recycled wrapped gifts. No one has to know!

Let's begin by getting 2 pieces of used tissue. Anytime there is tissue in a gift at our house, I take it and fold it up and store it away for later. It always comes in handy! So here I've decided on two sheets of used pink tissue.

Get your iron out and set it on a very low setting, one of the lowest until you figure out just how much heat you need. Very little steam as you don't want your tissue wet.

Start in a corner and make sure that the iron isn't too hot. When you have the correct heat and the iron is taking the wrinkles out of the tissue continue to iron both pieces of tissue until wrinkles are gone and paper is smooth.

Once you have ironed your tissue you will need to get your ribbon. I'm using the curly ribbon dangly stuff you can purchase at the dollar store. If your ribbon is super wrinkled or looking a little tired (mine was) you may either steam it using a kettle or regular steamer. I happen to have a clothing steamer so I will be using this.

Holding the ribbon a safe distance away from the steam, begin to steam your ribbon and you will see the bends and wrinkles fall out.

On this particular bow I will be taking off the clear plastic sticky piece. I just pull it away from the bow and it becomes unattached.

I need to then remove the staple and tape holding the ribbon together

Now that we have prepared everything let's begin to wrap.

I have a book about 6" X 7" that I'm going to wrap so I cut both pieces of tissue approx. 20" X 20" square and they are now one on top of the other. I'll be wrapping using both pieces together.

Note how I've got the tissue placed on the table (diamond shape), it makes it easier when wrapping. I've placed the gift in the centre.

I'll take the top corners and the bottom corners and hold as shown.


I'll bring up the last corner so I'm now holding all four corners. Note how the sides are all sticking out?It almost looks as though you see and "H". Each one of those pieces sticking out will need to be tucked inwards. Look at the bottom right corner that's sticking out. I will begin by gently easing that piece in towards the middle of the gift all the while holding the top corners. I tuck it in as if it popped out and I need to put it back. It's easier than you think! I repeat for all remaining corners.

Once all the corners are tucked in I gently grab the tissue as close to the the gift as possible being careful not to pull too hard as the tissue may tear at the corners.

I take one of the loose ribbons

Wrap it around where I was holding the tissue and tie a knot.

Once the knot it tied I gently separate the two pieces of tissue at the top.

I will now tie three (3) more pieces of curly ribbon on the gift and begin to embellish.

Here is where you may get creative. You may decorate your gift with almost anything but I'm going to grab my paper scraps I had previously cut and never used (I keep these in a zip lock bag, perfect for this) it makes the wrapping go so much quicker. I chose a piece of leftover loopy border and cut it in half. I then took my scissors and snipped apart two loops.

I twisted the paper and slipped the one side into the slit I cut and it created a bit of a curl.
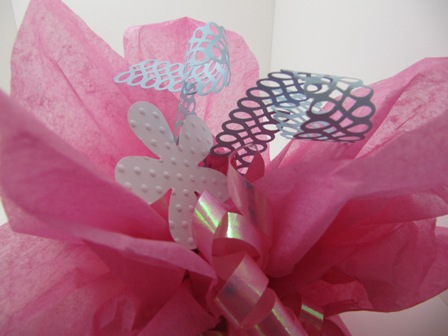
I found a flower in my cut scraps and added it to the two curly pieces. Because of the tissue being separated at the top (it makes it easy for items to stay in place) the pieces I added hooked right into the middle of the tissue and didn't move. Perfect!
Here is the finished product. I wanted to show you how easily you can wrap a gift using some recycled tissue a recycled bow and some left over scraps. It makes a lovely wrapping for your gift.
The possibilities are endless and with a little imagination you can turn your wrapping into a work of art at no cost. It's your turn...go ahead and suprise someone with one of your lovely recycled wrapped gifts. No one has to know!
Wherever you are in
your day, I hope you're enjoying it!
Wishing you many wonderful
creations.
Hi honey - I just LOVE this clever wrapping tip. I'll take up your blog gift (thank you sooo much)over the weekend and post a response - am thrilled! Right now we're battling with a fairly new carbon monoxide alarm which keeps telling us we have poison gas in here. I think the alarm is cr*p but if it all goes silent from my workshop - you know why! No worries really, my beloved personal security guard will be up all night chacking - and I hope, if the gasmen turn out, they're hunky and in uniforms! Sleep well, I might just do so :) Di x
ReplyDeleteDi again......relax. I'm still here - my OH realised that the carbon monoxide detector went off when I put the lights on under the kitchen high level cupboards - some sort of electronic interference waaaay too complicated for my simple female brain :) He's laughing 'cos I ran away and posted my 'notice of possible death' on your blog :)) Sheesh - wot a life! Never a dull moment :)) Di xx
ReplyDeleteWhat a lovely way to wrap a gift - TFS.
ReplyDeleteThank you also for the 'heads-up' about the DT call. I'm thinking about it but to be honest I'm scared stiff - need to think some more.
Toni xx