
.....another idea from head to paper.
It's Wednesday again and you'll have to read my entire post before you get to see my desk today. When I looked at the picture....it really scared me so you'll have to wait till the end to see it!
If you've been following my blog lately I've been on this creative Christmas streak. So far I've made a Christmas tree branch with ornaments, a Christmas wreath and just the other day I made a Christmas tree all out of cardstock. This is where I feel right at home, it's my thing I guess you could say. I have as much fun making these cards as I do when it's Christmas time and get to create the real thing. I'm in my Happy Place while doing this.
As promised, I said I had some ideas in my head and as soon as they got to paper I would share them.
 I began with a large black planter. My take (first attempt - prototype so to speak) on one of the planters you see at the green houses filled with all that gorgeous greenery. Pssst.....I have some great ideas if any one of the companies who make punches want to talk to me. Wouldn't it be great to have all the Christmas greenery branches available in punches? Anyone know anybody who does this, tell em to give me a call. I've got so wonderful suggestions! Well, you just never know right? Can't blame a girl for trying now, can you?
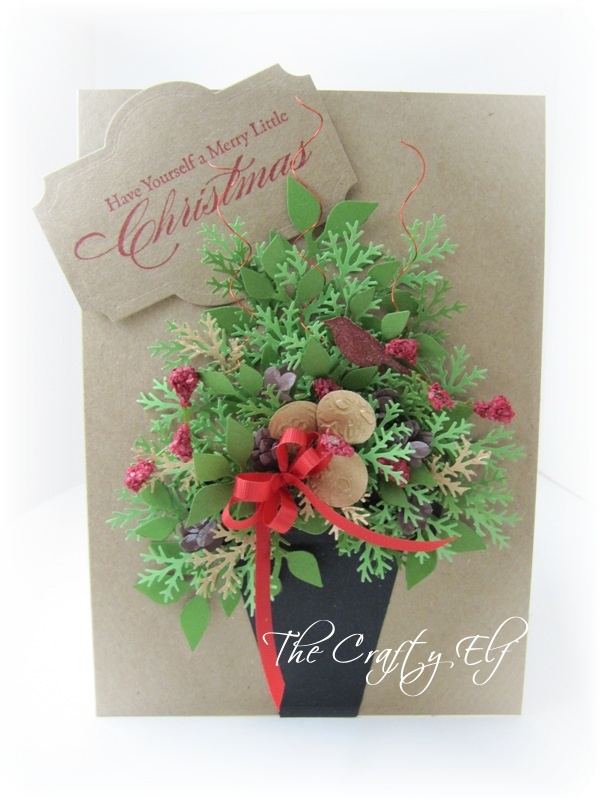
 So, here is my finished card. I would of loved to have had a few more punches available in some of the different greenery's available at the greenhouses but I used what I had and I think it turned out quite nicely.
I used the Sizzix branch with leaves die and the Martha Stewart pine branch punch. These two punches created the entire greenery.

This is a close up of a pine cone I made from a flower punch. I cut the petals apart from the flower and layered them while gluing the ends together. It photographed a bit purple but it's actually brown chocolate chip cardstock.

I added three gold balls as ornaments to the urn and made a lovely bow to decorate. I cut a few stems of tiny red flowers from a flower sprig I had and added three branches each with three little stems and flowers.

Couldn't resist adding a bird. I have a sentiment stamp that had a tiny bird on it so I stamped the image onto Kraft cardstock in Cherry Cobbler ink and when it dried, I cut out the bird. I then coloured the bird with an atyou Spica marker (from the makers of Copic) in #3 Red. Love the way these markers add glitter!

We've all seen these colourful sticks and some of us have used them! I wanted a little extra something to embellish the planter. These curly sticks are usually available at all stores selling Christmas greens or tree decorations. They come in a variety of colours, glitter or no glitter, thin or wider branches. To create these curly sticks I used red wire. I wrapped the wire around and around the end of my piercing tool. I slid the wire off and stretched it to create the look I wanted. I then used wire cutters to trim the wire to the length I needed. Dipped the end of the wire in glue and placed it on my card to create the look I was going for. So easy.
That's my card and if you would like to see the Christmas tree branch, Christmas wreath with tutorial ormy Christmas tree, check out the posts below.
I guess it's time to show you my desk. If you want to see what other's are creating on their work desks this week you must visit here. This wonderful lady named Julia works very hard each week to gather people from around the world to share what they've created. This really is worth the visit and you'll be quite impressed with the talent. You might even find yourself joining in this wonderful journey.

So this is what my desk looked like and I have to say......I'm kind of ashamed. See the Ewwww? I had a pin stuck in the tip of my bottle of glue so I didn't have to keep screwing and unscrewing the lid while working. The pin (cheap metal I guess) turned a glob of glue this awful colour of brown. The yellow arrow shows my pine cone progress. There is the little spool of red wire there and the piercing tool I used to wrap the wire around and around on. Oh, and there is the little plastic branches of red flowers I used. A piece of red ribbon, my wire cutters, ATG gun and the rest of my creative mess. Must go! I'm off now to visit my blog friends around the world. Thank you so much for stopping by today and visiting,
Wherever you are in your day, I hope you're enjoying it!
Wishing you many wonderful creations


It's Wednesday again and you'll have to read my entire post before you get to see my desk today. When I looked at the picture....it really scared me so you'll have to wait till the end to see it!
If you've been following my blog lately I've been on this creative Christmas streak. So far I've made a Christmas tree branch with ornaments, a Christmas wreath and just the other day I made a Christmas tree all out of cardstock. This is where I feel right at home, it's my thing I guess you could say. I have as much fun making these cards as I do when it's Christmas time and get to create the real thing. I'm in my Happy Place while doing this.
As promised, I said I had some ideas in my head and as soon as they got to paper I would share them.

I used the Sizzix branch with leaves die and the Martha Stewart pine branch punch. These two punches created the entire greenery.

This is a close up of a pine cone I made from a flower punch. I cut the petals apart from the flower and layered them while gluing the ends together. It photographed a bit purple but it's actually brown chocolate chip cardstock.

I added three gold balls as ornaments to the urn and made a lovely bow to decorate. I cut a few stems of tiny red flowers from a flower sprig I had and added three branches each with three little stems and flowers.

Couldn't resist adding a bird. I have a sentiment stamp that had a tiny bird on it so I stamped the image onto Kraft cardstock in Cherry Cobbler ink and when it dried, I cut out the bird. I then coloured the bird with an atyou Spica marker (from the makers of Copic) in #3 Red. Love the way these markers add glitter!

We've all seen these colourful sticks and some of us have used them! I wanted a little extra something to embellish the planter. These curly sticks are usually available at all stores selling Christmas greens or tree decorations. They come in a variety of colours, glitter or no glitter, thin or wider branches. To create these curly sticks I used red wire. I wrapped the wire around and around the end of my piercing tool. I slid the wire off and stretched it to create the look I wanted. I then used wire cutters to trim the wire to the length I needed. Dipped the end of the wire in glue and placed it on my card to create the look I was going for. So easy.
That's my card and if you would like to see the Christmas tree branch, Christmas wreath with tutorial ormy Christmas tree, check out the posts below.
I guess it's time to show you my desk. If you want to see what other's are creating on their work desks this week you must visit here. This wonderful lady named Julia works very hard each week to gather people from around the world to share what they've created. This really is worth the visit and you'll be quite impressed with the talent. You might even find yourself joining in this wonderful journey.

Wherever you are in your day, I hope you're enjoying it!
Wishing you many wonderful creations

Love you card, its a fantastic creation. I have had the same ewww moment with a pin in my glue, not a good moment!!!!
ReplyDeleteHappy WOYWW
Cathy xx
Gosh you sure are getting into the christmas spirit.Love all the crimbo makes.Still think your early ...lol only as ihavent the mojo to start and think about crimbo.
ReplyDeleteAnyways have happy creative week
hugs judex 10
I'm totally impressed with your card and the fact you have a Christmas counter on your blog. You really DO get into Christmas in a big way.
ReplyDeleteThat card is simply stunning and has given me lots of ideas, my head is in a spin now!, thanks for sharing.
ReplyDeleteHelen x
Gorgeous card, just lovely.
ReplyDeleteIt CAN'T be worse than mine! There's even bread crusts hiding in one of my pictures... do love those ferny leaves, but mine will only cut paper which is a bit of a disappointment. back later!
ReplyDelete((Lyn))
happy woyww
Yup when the pin rusts it goes an amazing shade of ...busy lovely desk this week,
ReplyDeleteDx
I love that planter full of foliage - it's amazingly detailed and lush considering you only used two stamps!! I like your twirly whirly red wire wotsits too :) xx
ReplyDeleteWow this is simply stunning. You must be very patient as it must have been painfully fiddly to make but well worth the effort. I'm gonna have to look at your other posts to see the other Christmas goodies. Thanks for sharing xx
ReplyDeletePS I've become a follower!!
ReplyDeleteFABULOUS!!! I'm loving what you are making using these punches...can't wait to see what you come up with next.
ReplyDeleteToni xx
Thanks for sharing your space this week, I always enjoy visiting and hope you have a fabulous rest of the week. so much work into your card, it is beautiful
ReplyDeleteWhat a lovely idea! Thank you for sharing! I am not in the Christmas mood yet but I guess with 100 cards I have to make I better start...
ReplyDeleteHugs,
Cardarian
I love the colours on your workdesk today! Lots of bright colours to enjoy. Happy WOYWW!
ReplyDeleteWow that is Christmas from head to toe - just burdting with Festive loveliness!
ReplyDeleteThanks for sharing your desk!
Sarah (at 1)
I really expected your desk to be chaos ...but it wasn't!!!
ReplyDeleteLove that card ...I loved seeing it 'grow' from the pot to the spectacular 3D card.
Cool project, thanks for the snoop!
ReplyDeleteClare H
Great idea using the wire for the twirly bits. Looks every bit as good. Just off to read the rest of your posts now. Hugs Mrs A.
ReplyDeleteNow I really NEED that punch by MS! I have some ideas about how to make your twigs etc...I will drop you an email
ReplyDeleteVery cool...creatively awesome! Pop Art Minis
ReplyDeleteThat card is just amazing! have a happy Wednesday! Mel (43)
ReplyDeleteThis is so beautiful, I really like it. I'm afraid I have to start thinking about Christmas projects as well.
ReplyDeleteGorgeous!! How you have the patience beats me but the results are just stunning :)) 'Jingle Bells, Jingle Bells!!' Just getting into the mood here :)) Hugs, Di xx
ReplyDeleteJust beautiful, loved all the punched projects in the last few days, may have to have a go at this, perhaps the wreath would be a good start.
ReplyDeleteHugs
Brenda 88
ooh, what a fantastic urn, its hard to believe all the foliage is from just 2 punches-amazing.
ReplyDeleteThat xmas card is great!! so much detail, that is one thing I am completely lacking in either a foliage die or punch i really need at least one!. Your desk looks very creative, always nice to see a busy desk. x
ReplyDeleteLove the Christmas card, and the desk! don't worry, mines as bad,lol.Happy WOYWW, Shaz
ReplyDeleteLove the finished planter - and the bird is the perfect finishing touch. Your desk is so pretty with the berries on it.
ReplyDeleteI’ve a giveaway over on my blog, you might like to take a look at:- http://silverscrappers.blogspot.com/2011/09/my-memories-suite-digital-software.html
Elizabeth x #125
AH what fun you have had and hope someone gets in touch with you for a the great punch ideas ...just love the card and thanks for inspiring us to get moving happy WOYWW Shaz in Oz.x
ReplyDeleteEach card is so beautiful you're a master Chritsmas crafter, I love this little beauty, Gay xxx
ReplyDeleteAnd another stunner, just magical! Gay xxx
ReplyDeleteOh my gosh I can guess you had a fabolous time making this card. Love it all. Such creativity. I'm actually getting in christmas spirit. Thanks for sharing with us at the Kaboodle Doodles and good luck.Hope to see you back monday for a new challenge. Bettina x
ReplyDeleteWow! What a beautiful card! You're right, there should be punches for the other Christmas ferns and stuff. Whoever receives the card will be ecstatic! Patsy from
ReplyDeleteHeARTworks
Thhis is lovely! Given me loads of inspiration - and I;ve done exactly the same thing with my tacky glue - left a bobble head pin in that went rusty - eeeuwww!!!
ReplyDeletethanks for visiting and enjoying my 'crafter's spread!'
Debs
Amazing card, thanks for sharing! (very delayed catch up this week, it's nearly Wednesday again!)
ReplyDeleteThis is lovely! Given me loads of inspiration. Great ideeas. Thank you sharing..
ReplyDelete