Showing posts with label Copic Markers. Show all posts

Tuesday, July 19, 2011

A Winter Wonderland

I love that phrase! 

But today, the phrase is more than just a phrase .... it's a challenge.  A Winter Wonderland challenge.  I learned of this great challenge from My world...sort of.

Every Friday at Winter Wonderland a different challenge is posted.   Your creation doesn't have to be a card,  you can make a decoration, a tag, a scrap layout - whatever you wish.  Last Friday, the challenge posted was  Give it a Little Lift, wet or dry embossing.  If you want to get a head start on your Christmas cards or Holiday crafts, why not pop over and join in the fun?

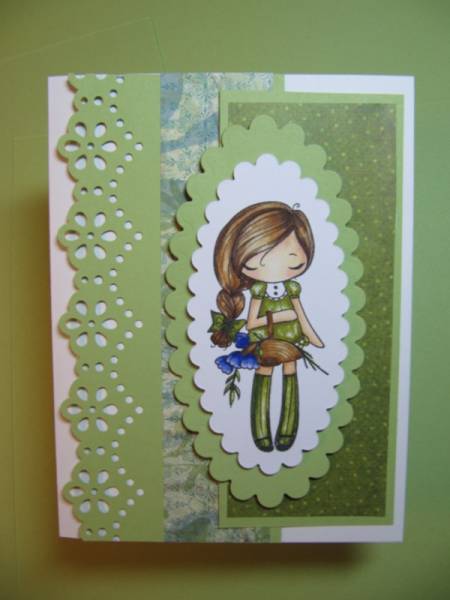
Here is my entry, I chose dry embossing and to make a card.


Paper - Designer Paper is from K & Co, solid colours are Old Olive, Certainly Celery, Real Red and Brocade Blue from Stampin Up.
Stamps - House Mouse Winter toboggan and Lili Of The Valley sentiment
Ink - Stampin Up Cherry Cobbler for the sentiment and Memento Black Tuxedo for the image
Accessories - Copic Markers, Piercing tool, White Flower Soft for fur on hat and snow, Stampin Up Scallop Border Punch, 2" scallop circle punch, 1 3/4" circle punch. polka dot embossing folder and blue buttons for embellishments.


Wherever you are in your day, I hope you're enjoying it!
Wishing you many wonderful creations.
Thanks for visiting
Photobucket

Tuesday, July 5, 2011

Christmas in July

I hope everyone had an awesome long weekend and things are getting back to normal for all.  We are now officially headed into the summer mode and many I'm sure, looking forward to great weather and summer vacations. 

I began my day sealing our driveway.  Call me crazy!  I'm one of those people that enjoys the physical work and has the mind set that if I can do it, why pay someone?  The way I see it, the money saved can be used elsewhere (*wink, wink*).  Getting out early this morning was key to avoid the extreme heat of  the day and free me up for other things I have planned today.

The first thing on my list was to join in Crafty Hazelnut's Christmas challenge #27.
It's a colour challenge and you must use pink and/or purple.  As it's the first Saturday in the month there will be a prize for a randomly drawn winner and the prize is a wonderful stamp set.   Pop over to check out the challenge and the prize, while you're over there ......why not play along?

Here is my entry for the challenge.  I used a Lili of the Valley image and sentiment both matted with purple cardstock.  I cut one piece of pink cardstock 3" X 6 1/2" and embossed it with Cuttlebugs script embossing folder, cut a second pink piece of cardstock same size and used a Martha Stewart border punch.  I placed a purple piece of cardstock between the two pieces of pink and used a scalloped border punch to finish the visible edge.   To colour the image I used my Copic markers (which I won as blog candy months ago and am so thankful to Lisa at The Crafts Meow for) and Stampin Up Lovely Lilac ink for the sentiment.  I finished the card off with a purple ribbon and added some white flower soft for the fur and snow.

Now, on to my next project, the final coat of paint on my front hall. Yipeeee!

Wherever you are in your day, I hope you're enjoying it!
Wishing you many wonderful creations.
Thanks for visiting
Photobucket

Thursday, June 16, 2011

Copic Marker

It happened!  My Copic colorless blender marker ran dry (argh).  Right in the middle of my project for the Less Is More challenge I was working on.  Naturally I couldn't believe it so I continued to use the marker knowing full well it was dry - DUH.  I took the cap off the other end just to make sure I wasn't wrong and I tried using that end to see if there was still some ink left.  Nope!  Not on that end either.  It's was dry, bone dry!  So now what do I do?  Well, if this has happens to you, whatever you do, don't throw your marker out.  You refill it!  This is much more cost effect than purchasing a new marker, so I've learned.  I have actually learned a lot today and I love learning new things.  I hope that maybe you might learn something new too, read on.

I thought I would share with you how I refilled my marker. 

The tools.  1 bottle of Copic Various Ink, dry marker and an unused syringe I found in the cupboard

I removed the protective cover from the bottle and the plastic wrap off the syringe

I used the syringe that I had leftover from some medication for my daughter (she can't swallow pills very well) which I knew would come in handy someday.   I proceeded to draw up some ink from the bottle into the syringe

I only filled the syringe up a little, I knew I could always add more if needed.  The beauty of the syringe was that there was no waste.  I just put the unused portion back in the bottle.

Drop by drop I added the ink to the chiseled end.  For amount needed, read information below.

 I was so happy to have my blender pen back in working order....fewf!


I've found some great information I'd like to share with you for those who don't already know.   Copic Marker Scrapbooking is a wonderful site and this is what they had to say about Copic markers.  The site is definitely worth a visit.

Markers - Refilling

How to know when it’s time to refill. Test both ends of the marker. The biggest hint that it’s time to refill is when using the chisel end you see streaks. On the brush end you’ll need to refill when the ink has a harder time reaching the tip of the brush. If one end is dry but the other is juicy you may think your marker is fine, but it’s not. It still needs to be refilled. Over time, if you find it difficult to evenly soak your paper or blend with some colors then you probably need to refill. You’ll have to refill your favorite colors sooner than you think.

Some things to consider before you refill:
  • Work over a protected surface. A thick paper plate, pie tin, or a stack of old newspapers make a great barrier for spills.
  • Make sure your refill color matches the marker. This is an easy mistake to make.
  • Have everything ready before you start, including your clean-up supplies. Keep a bottle of rubbing alcohol (isopropyl alcohol) or hand-sanitizer and some paper towels for clean up.
  • The Refill cap unscrews. Don’t try to pull it straight off like a marker lid, and whatever you do, don’t squeeze the bottle while unscrewing it. You’re bound to make a mess. Unscrew it over your protected surface. Refill from the chisel end of the marker.
  • Give yourself plenty of time to refill. Accidents happen when you get distracted or in a rush.

Amount of Ink to add:
Each little mark on the side of a bottle of ink is 1 cc. These numbers will slightly underfill your marker, but it’s better to underfill than overfill.
  • Ciao- add 1 to 1.5 cc’s
  • Sketch- 2 cc’s
  • Copic 2-3 cc’s
  • Wide 3-4 cc’s

Refilling Copic Markers - Download the pdf instructions HERE.

Sketch, Copic and Ciao - Drip and Dab This is the most direct method of refilling. Using the dropper built into the various ink bottle simply drip/dab drops of ink onto the chisel nib of your marker. Touch the very tip of the ink bottle to the tip of the marker. To refill a marker it takes about 20-30 drops of ink. Let each drop get sucked in before you add the next drop.

Remove Nib and Fill This method is much faster than Drip and Dab. With your tweezers pull the chisel tip out from your marker. Take the cap off the other side of the marker (this helps to avoid getting air bubbles and allows the ink to seep in better). Carefully pour in the ink. Don’t squeeze too quickly since it’s easy to mis-judge how much ink you’re adding. When you’re done, put the nib back in and put both caps back on. Let your marker sit for a moment so the ink evenly distributes within the marker.

Refilling with the Booster Needle Refilling markers with the Copic Booster needle is the most accurate and quick. Attach the Booster over the built-in dropper on a bottle of various ink. Then insert this into your marker, squeeze gently until you’ve added the correct amount of ink.

Copic original Markers If you look at the chisel end you will see a little gap between the nib and the plastic barrel. The booster needle fits down into that gap and easily fills the marker. As the needle enters the marker you will feel some slight resistance- this is where it is meeting the sponge reservoir inside. You don’t need to jam the needle all the way until it stops, just until you feel the slight resistance.

Sketch or Ciao Markers

Cleaning out the booster needle An easy way to clean the needle is to put it into a small cup and add a little rubbing alcohol to rinse it in. Another easy way to clean it is to take an empty various ink bottle, fill it with rubbing alcohol, and squirt it through the needle until the juice flows clear. Either way, be sure that the whole needle is clean inside and out, and the base is clean.

Using the booster with different colors You don’t need a different needle for each marker color, but you do need to clean out the needle really well between different colors. If I need to fill a pale blue marker and a dark blue marker, Do the light color first, then rather than clean out the needle you can get away with using it directly with the darker blue ink. However, when switching color families rinse out your booster well to make sure you will not contaminate your marker.

Refilling Wide Markers

Touch the dropper to the wide nib by resting it in the groove built into the barrel. Gently squeeze to add ink. If you want, you can pull out the wide nib and drip ink down into the gaping barrel instead.

Replacing Nibs

When you are refilling your markers this is also a good time to replace damaged nibs, so keep a supply of replacement tips and a pair of tweezers. Copic tweezers have little gripping teeth to get hold of the nibs better. There are nine styles of Copic interchangeable nibs, from broad to calligraphy, that provide greater freedom of technique in your renderings.

How to Change Marker Nibs
  • Using the tweezers pull the large nib out of the marker.
  • Insert the new nib slowly back into the marker.
  • The ink will wick form the inside out to the end of the nib. This may take a few minutes.
Airbrushing When airbrushing, you can use either the Sketch or Copic markers in the ABS system. First take of the cap of the marker, each nib type will have a different affect in the system. If working with the chisel nib, have the chisel putting up and push it in until you feel it snap in. The ABS works by spraying air across the exposed tip of the marker. You can hook your system up to either special cans of air or an air compressor. To change colors you pull out the marker and put in a new marker.

Uses Most commonly it is used for filling in large areas (backgrounds) or coloring 3-d objects. Wigs, fly fishing lures, paper boxes, teddy bears, metal, embellishments, clay are just some of the possibilities of things one can create.

Masking Your Art If you want a fine line or crisp edges you need to mask your art. For any kind of crisp edge you need to mask your image in some way so the spray goes only where you want it to go.

Different Mask Types


1. Paper.
This can be as simple as holding a torn piece of paper in place with your finger, or cutting out detailed shapes in paper and spraying around them. You’ll want to make sure that your edges are securely held to the paper or else you’ll get the spray creeping under the edge of your artwork. Spray straight down over the paper or aim your spray so your air isn’t aimed up under the edge.

2. Adhesive Papers & tapes
This includes everything from standard masking or painting tape to low-tack stickers and sticky notes. You can even put down a few sticky-notes to make crisp straight lines without much fuss. Always test the surface you’re sticking to so you don’t ruin your artwork.

3. Masking Liquids
Mask out the areas you plan to airbrush with masking fluids. Masking fluid can be applied with an old, worn-out brush to those areas that are to be protected then allowed to dry. Once the surrounding area is finished being colored, the masking fluid can be removed to once again expose the white of the paper underneath. To remove the mask, rub it gently with a clean dry finger.

4. Masking with Objects
Doilies, die cuts, lace, punches, gravel, and leaves, are all objects one can use to get a pattern. However, you will have the same challenges as plain paper in keeping your edges down to prevent overspray. Some objects, like the metal dies, can be cleaned afterwards with hand sanitizer. Other objects can be sprayed on as many times as you would life. Whatever you mask with be sure it’s something you’re OK with getting dirty.

Blending

Marker Blending on Paper 1. Color evenly, really soaking the paper. Color in circles to keep you edges wet and to avoid streaks.
2. While it is still wet, add your darker color to one side. Lift up at the end of the stroke, so you have more ink on the shadow side and less on the edge where it will be blending. You can do this step after your base color has dried, it is easier however to do it while the base is wet.

3. Go back over the darker color with your first color. Add a lot of ink and really soak it in. This is what hides those rough edges and mixes the two colors together to get a smooth blend. If this doesn’t work for you, try using colors that are closer in value to each other, or use lighter colors to begin with.
Repeat steps 2 and 3, layering more and more ink until it gets as smooth as you want it. You won’t destroy your paper, don’t worry.
4. Add a third color if you wish, again, using the same technique. Start with your lightest, add your middle color, go back with your lightest to blend those two layers together, then add your darkest, then go back with your middle to blend the dark into the rest of the picture. Finish up by using your lightest color.

5. Use the colorless blender to add a highlight back in. For a stronger highlight, use Opaque White and paint a white spot back in.

Marker to Marker Blending This works with any two Copic markers. If you want the color area to fade to white, use a blender pen as one of your colors. If you wanted it to fade to yellow, then choose a yellow as your “brush” color. Always use the lighter color to pick up darker colors, that way you can see how much color you’re picking up.

Use the colorless blender as a paintbrush and pick up some of the color from your other marker, directly onto your blender pen. Start with small dabs of color until you see how much/how quickly it will fade out when used. Next, choose a picture that you want to color, and touch your marker at the darkest point you want. Then color out towards the lighter side. If you’re done blending with that color but your tip still looks dirty, just scribble onto some scratch paper until the color comes completely off.

Effects with the Colorless Blender

With the colorless blender, we expect blending, but it really does the following best:
  • Lightens Color
  • Pushes color
  • Fades color to white
  • Great for Special Effects
  • Blends Color
  • Fade to white by pushing colors
  • Start with an area that you’ve only colored the edges. Make sure you have good scratch paper under your work for this technique.
  • Color from the lightest spot, out towards the edges. Don’t stop in the middle or it will give you ugly lines/streaks. Use a lot of blender, so it’s really juicy and is shoving that color around very strongly.
  • Color almost to the edge, but not over. Remember, your color is getting pushed in front of your blender, so if you color up to the line it will go over. Also note how dark the color is around the edge. This is at least 1 or 2 shades darker than my original color, so try this technique with lighter colors until you get an idea of how it will react. If you need it lighter then let it dry and repeat.
  • If you want a nice subtle shadow that fades out from your image then try the same thing, only use a lot less blender and a much lighter touch
Papers Make sure to always test your paper. These markers work differently on each style of paper. Some things your want to be aware of are bleeding and feathering of the markers. It is okay if the paper bleeds the ink through the back, you will just want to have a scratch piece of paper behind your work. However, watch out for papers that lead to ink feathering, this is when the ink spreads outward on the paper. To see specific paper types refer to the paper section of the product page.

Digital Printouts Copic Marker inks will not destroy lines printed out from a laser printer or standard photocopier. This is because they are toner-based devices and the toner is fused to the paper so the alcohol ink from the markers will not destroy it. However, with inkjet printers, each printer uses slightly different inks and you need to test your printouts before you color or you could make a mess. Newer inkjet printers seem to work better than the old; but to be safe you should always test them out.

Multiliner SP

Refills - If ink is not flowing properly from your pen, the ink cartridge should be replaced. There are two sizes of cartridges: Ink cartridge A refills sizes 0.03, 0.05, and 0.1. Ink cartridge B refills sizes 0.2, 0.25, 0.3, 0.35, 0.5, 0.7, and BS. To put in a new ink cartridge, pull the old cartridge out from the bottom, by using the larger of the two openings on the SP Changer or by simply pulling it out by hand. Next, push your new cartridge, without the lid, up into its place. Download this pdf for a visual explanation.

Replacing Nibs

To replace the nib, use the SP Changer. This product can be used by placing the small opening around the metal indent towards the bottom of the nib and pulling upward. To put your new nib into the multiliner push it into the pen and make sure the wick makes clear contact with the ink reservoir. Download this pdf for a visual explanation. Avoid frequently pulling the nib in and out, this will cause damage to the wick and result in poor ink flow.

Line Variation
You can achieve the thick/thin line variation when drawing by pushing heavier or lighter. Even though the pen tip is very firm and has no flexibility without breaking, it is still possible to push less or more. The trick to this is have something softer under your paper other than just a firm table surface. Always keep a few sheets of scratch paper under your work, the added depth has a slight give to it so you can push harder without damaging the pen tip. Working in a sketchbook is a great way to get this line variation.

Paper Use and Care:

Copic Multiliner inking pens work best on very smooth grained paper. The Copic Multiliner inking pens also work well both with watercolors and on watercolor paper. When working on rough surfaces, caution is recommended while using the finer nib sizes.
Wherever you are in your day, I hope you're enjoying it!
Wishing you many wonderful creations.
Thanks for visiting

 Photobucket

Sunday, January 16, 2011

A Wonderful Find - Storage Containers For My Copic Markers

 I was out and about today and came across what I think was an amazing find.  I have been looking for some kind of container(s) to hold my new Copic Markers.  I've looked at all different types of various containers in the last month or so but never quite found exactly what I wanted.  Today, was a different story.  Have you ever looked at something on a shelf in a store and thought, that is exactly what I've been looking for?  I did just that.  I actually found myself speaking out loud saying "now that is what I'm talking about."  I grabbed 9 of these precious little containers and even went back later to get three more.  I may just have to make another trip back and pick up some extras just in case.  You just never know.  My Copic collection is probably going to grow....what do you think?  Well, enough of the drama let me show you what I'm talking about. 

These are the containers

This is what I did with them - SCORE!

Now you can see why I was so excited, can't you?

Friday, January 14, 2011

Using My Copic Markers

Picked up the cutest stamp set the other day.  Isn't it adorable? 
Miss Anya Collection
It's by The Greeting Farm and it's called Miss Anya Collection.  I decided to make a card using one of the little girls and my new Copic markers and thought this stamp set would be perfect.  For those of you unfamiliar with Copic markers I have printed a description below.  I only just began my collection of these expensive little things but I must say they are worth every penny.  The markers are advertised on the internet for as little as $4.95 each (plus shipping) but most art and speciality craft stores sell them for around $6.95 each.  They do come in kits which are expensive but the average person would probably purchase them individually.

Copic Markers are the original line of high quality illustrating tools, used for decades by professionals around the world. They are preferred for Architectural design, product rendering, and other forms of Industrial design. They are also popular among the hobby industry for use with models, ceramics and similar projects. They are of the highest quality, longest lasting, most versatile markers available anywhere. There are over 300 colors, replaceable nibs and ink refills and fantastic to useThe can be purchased at most art and specialty craft stores.


So here it is.  I picked the colours of my card first and then coloured her to match.  Too cute! 


Here is the card I made to match