
...and a tutorial.
Happy Friday everyone and here's to the weekend!
If you follow my blog at all, you know I love Christmas. I've made a card today and I want to share how it was done . If you love this wreath as much as I do, follow along and you'll be on your way to creating your very own.


I used a Martha Stewart Pine Branch punch and punched out several branches in three different shades of green. This will give the wreath some depth.

I used a post it note pad and squeezed out a small amount of clear drying glue. Now I'm ready to go. You can always add more glue as you go along. You don't want the glue drying out on you.
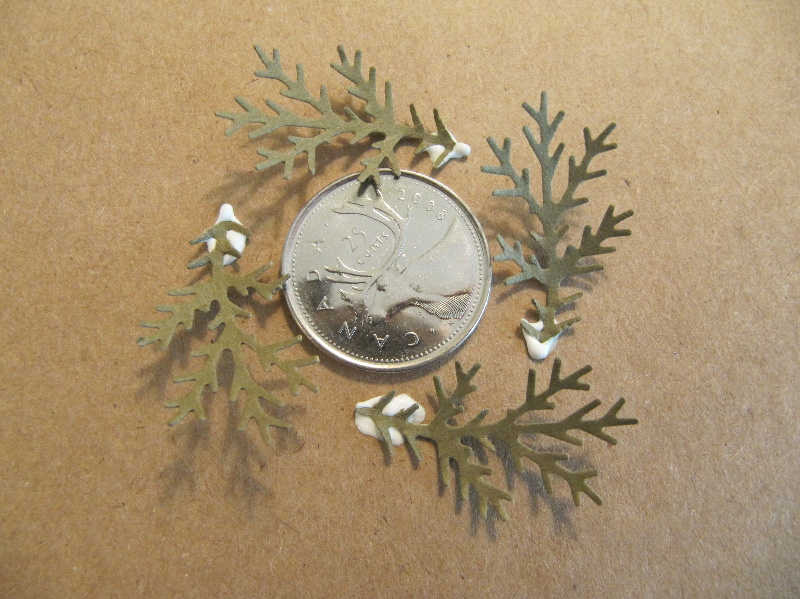
 I begin by placing four branches around the quarter to make sure I'm happy with the size.
 Dipping the end of the branch in the glue, I begin to create the wreath starting with the darkest of the three colours of branches.
 Here you will see the first four branches glued in place. Looking good!
 One thing I love about this particular branch punch is that the leaves, once punched have a bit of a curl to them which is perfect for this project.


 Here you will see the layers and how nicely the wreath is coming together.

Here is a view looking down. Looking better!

 At this point I want to make make sure I have a fairly round wreath. I add the final branches while making sure to hide any ends of branches showing and then for that extra touch I will add a few branches going in the other direction. What? Branches going in the other direction?? Trust me! You'll see how nicely it finishes it off. Above, I've used a stylus to point to one of the lightest colour of branches that I've added and to show how it's positioned in the opposite direction.
 Here is the final wreath and you'll see there is still some white glue showing but it will dry clear.
 This gives you a better idea of how full the wreath is and by adding just a few branches in the opposite direction, it finishes the look nicely.
 I made a very small bow with a bit longer tails (tails are the long ends on the bow) allowing me to weave some of the ribbon through the wreath. To see how this style of bow was made visit the video on my blog. The concept of the bow I tied doesn't really change only the size of the ribbon and bow. You'll notice that I've added a larger amount of glue, this is to ensure that the bow adheres well to the wreath. I'm holding the bow down with the stylus to help secure it in place.

Once the glue on the bow was dry I played with the loops a bit to get them where I wanted them. I also punched some more branches but in red this time and added them and a few small flowers to the wreath to give it that extra little something. How you decorate your wreath is entirely up to you.

 I cut two Spellbinders Nestabilities - labels 21 for the top, one in Real Red and the other from a scrap piece of Kraft cardstock. The sentiment is from Stampabilities and stamped in Real Red. Both label die cuts were secured on to the card with large dimensionals.
Once again, here is my card.
I'm thinking blue and silver. Can't you just picture a silver wreath with a touch of blue?

Happy Friday everyone and here's to the weekend!
If you follow my blog at all, you know I love Christmas. I've made a card today and I want to share how it was done . If you love this wreath as much as I do, follow along and you'll be on your way to creating your very own.

Beginning with the placement of the wreath,

I placed my cardstock for the sentiment at the top of the card allowing me to see how much room I had and how large I wanted the wreath to be. Next, I used a quarter to visualize where the centre of the wreath would sit.

I used a Martha Stewart Pine Branch punch and punched out several branches in three different shades of green. This will give the wreath some depth.

I used a post it note pad and squeezed out a small amount of clear drying glue. Now I'm ready to go. You can always add more glue as you go along. You don't want the glue drying out on you.


For the next row, I repeat what I did with the first four branches to make sure once again I am happy with the size of the wreath. I don't know if you've noticed, but I'm positioning the leaves in a circular motion counter clock wise around the quarter. It doesn't matter whether it's clock wise or counter clockwise as long as the branches aren't positioned straight out from the quarter. A real wreath from a garden centre is wound or tied around a metal frame. The branches don't stick straight out the way an artificial wreath would. Just a tip! The choice is yours however I believe it makes for a more natural looking wreath.

Once again I will glue the branches to the card and this will form my outer ring that I will use as a guideline.


I continue to glue branches in the same direction and have now started to add the next colour of green to create some depth. I started with the darkest shade and I'll move along to the next shade until I reach the lightest, which will be added last. You'll notice I've now begun to add the branches between the two rows I had created and don't be afraid to overlap as this creates some volume to the wreath and hides the ends of the branches that are glued to the cardstock.


Here is a view looking down. Looking better!


Once the glue on the bow was dry I played with the loops a bit to get them where I wanted them. I also punched some more branches but in red this time and added them and a few small flowers to the wreath to give it that extra little something. How you decorate your wreath is entirely up to you.

I secured the tails of the bow down with the tiniest piece of dimensional that I cut. I find it works best. Glue may mark or stain the ribbon. If you use a coloured marker you can match the dimensional to the colour of your ribbon so it doesn't show, that's what I did.

I'm thinking blue and silver. Can't you just picture a silver wreath with a touch of blue?
Wherever you are in your day, I hope you're enjoying it!
Wishing you many wonderful creations
Wishing you many wonderful creations

Fantastic! So delicate and totally summing up Christmas - err, but where do I get a quarter from over this side of the Pond :) Joking, I think a 5 pence piece might be OK?! I love it - just perfect for Christmas. Eek, the weeks are running away now! Hugs, Di xx
ReplyDeleteThis is just stunning my friend. I love the touch of the added red fronds.
ReplyDeleteBlue & silver sounds like a super idea.
Toni xx
I love this wreath and tutorial! Would like to follow your blog. Is there a place where I can sign up? Thanks...Cindy
ReplyDeleteHi There, Fabulous tutorial and a wonderful card, I love the whole thing, inspirational work, Many Thanks, Gay xxx
ReplyDeleteBrilliant wreath and super tutorial. Very easy to follow, thanks. x
ReplyDeleteOlá!
ReplyDeleteVim agradecer e retribuir a visita!
Já estou seguindo os seus blogs,
que são lindos!!
Parabéns!
Vem me seguir também, estou começando!
Beijinhos e belo fim de semana!
This is absolutely gorgeous!
ReplyDeleteGreat thanks for the tutorial I am going to have a play today!! I'm soooooo excited (Pointer Sisters) I just can't hide it xxx
ReplyDeleteLoooove it. Wanna try this now.
ReplyDeleteThanks for posting! From another UK visitor. :-)
Loooove it. Wanna try this now.
ReplyDeleteThanks for posting! From another UK visitor. :-)