Showing posts with label Baby Shower. Show all posts

Tuesday, December 6, 2011

Presentation Is Everything!

I've got such a fun wrapping idea that I wanted to share with everyone today.  I've seen several takes on this and by just changing up the ribbon, this is a superb presentation that that will be a hit at any occasion!  For my gift, the ribbon I chose was pink which was perfect for the baby shower.  Red and white would work for Valentines Day, pastels for Easter and of course a multitude of ribbons for Christmas.  There is no adhesive that touches the boxes so they can be reused over and over again.


Three different size boxes, each one larger than the next.  Any shape container will work.  These boxes were purchased at Michaels


Wrap the ribbon around the box and overlap the ends approximately 1 inch and cut.


I used small two "Zots" (glue dots) on one end


Wrap the ribbon tightly and secure.


Do the same for all containers. 
They are now ready to be secured together.


On the middle sized container, add several glue dots to the ribbon on the bottom, center the box on the largest container and lining up the ribbon, secure.  Do the same to the smallest container.  Add glue dots to the ribbon on the bottom, center and line up the ribbon and secure to the top of the middle sized container. 


Now that your containers are secured together it's time for the bow.  Cut a piece of ribbon long enough that when folded in half covers the top of the container then add an inch and cut.  Cut a second piece of ribbon 2 inches shorter.  The third piece of ribbon should be cut to a size that creates a loop fitting your bow depending on the size of the first two pieces cut.  This third piece creates the center of your bow as shown on the boxes above.


Begin with the largest piece of ribbon, place glue dots on one end.


Bring the ends together and secure the end with the glue dots on top of the other end of ribbon overlapping 1/2 inch.


You now have a circle. 
On the inside of the circle where the ribbon is overlapped, add glue dots. 
To best describe this, where you see the darker pink above, add the glue dots to this area on either end


Press down slowly being sure to line up the edges of the ribbon

Repeat the above for the second piece of ribbon cut.


For the third and final piece of ribbon,


once again add glue dots to one and and fold over creating a loop


It should look like this


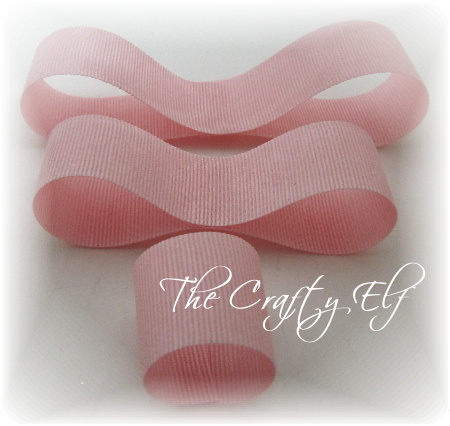
Here are the three pieces that will make the bow


Add glue dots to the bottom of all three pieces.  Begin by securing the smallest loop to the middle loop lining up the edges of the ribbon.  Add those two loops to the largest loop.  Your bow is now ready to add to the top of the containers. 


 Center the bow on top and line up the ribbon. Press to secure.


I love the way this looks!
It's your turn!

Where ever you are in your day, I hope you're enjoying it!
Wishing you many wonderful creations!

Photobucket

Friday, December 2, 2011

Slider Card...

...for a Baby Shower!

It's my niece's baby shower tomorrow and she knows she is having a little girl.  Through the flurry of flying papers an ribbon, out came the pink and white card stock and pink and white ribbon.   My niece loves everything simple!  Nice mind you....but simple.  Nothing wrong with that!  So keeping this in mind, I thought I would make something a bit different from the usual card and found Jennifer McGuire's tutorial fit the bill.  Jennifer has made a great little slider card and uses the most gorgeous ribbon.  I've opted for the "It's a Girl" ribbon because not only do I think the ribbon is darling, I already had it on hand. The decision was a no-brainer for me however I still love the ribbon that Jennifer used.  It just flowed through the hole on the card so nicely and looked so expensive, it would have been gorgeous on my card.


The stroller is quite lovely.  It's a brushed nickel look, made of a real thin metal


On the slider part, the embellishments are made of the same material
and it reads "It's A Girl" with a little flower for the apostrophe - too cute!


I've left just enough space on the bottom right to sign the card.


I'm off to wrap the gifts and will share those as well.  I have something in mind as to how I'm going to wrap the gifts, I just hope it works.  Stay tuned!!

Where ever you are in your day, I hope you're enjoying it!
Wishing you many wonderful creations.

Photobucket

Friday, April 22, 2011

Baby Shower Card #4

Friday is finally here....the end of another work week and start to the weekend - a long weekend.  Wahoooo!

It's Good Friday and Easter weekend....a time to celebrate!

This is my final of four cards today and now it's time to vote.  Please vote for your favourite Baby Shower Thank You card at the top left side of my blog.  Remember, the card with the most votes wins and will be the card I make several of as part of a shower gift for the expectant mom.  If you're not sure what I'm talking about kindly scroll down to Tuesday's post and read from there.  I'm actually quite excited as I've not done anything like this before where other people make the decision.  I'm not worried though!  I know I can count on my crafting friends to help out and that's why I'm putting this out there for you all to decide. 

Card #4 - click to enlarge


Thank you all again so very much in advance for your participation, I'm thrilled you are taking the time to help me out.  I can't wait to tell the woman who's asked me to make these thank you cards how I ended up with the card I did. 

Have a great Easter weekend, I truly appreciate you visiting my blog and participating in my Baby Shower Thank You Card decision!


Photobucket

Thursday, April 21, 2011

Baby Shower Card #3

So, now there are three!  Here is the third baby shower card to vote on.  I must say, it's been so much fun making them knowing that others are going to determine the winning card.  If you're not sure what this is about, scroll down to Tuesdays post and it will tell you everything.

Card #3 - click to enlarge


As always, thanks for visiting my blog, I'm so happy you stopped by.   Leave me a comment so I know you were here and I will visit you. 
Have a great day and remember, smile...it's contagious.
Photobucket

Wednesday, April 20, 2011

Baby Shower Card #2

Auntie Em, Auntie Em....where's Toto?  The wind last night and this morning has been just crazy!  

Alrighty now....here is my second card for everyone to have a look at and help me decide which style of Thank You cards I will end up making.   If you didn't get an opportunity to read my post yesterday, I've been asked to make Thank You cards for the expectant mom as part of a baby shower gift.  These will be the cards the mom to be will use to thank everyone for their gifts.  The only request was that the cards be white and the cost low,  the rest was left to me.  I'm asking for every one's help.  I'm making four cards and letting you guys decide.  I've posted the first of four cards yesterday and today's card is the second.  I will post the third card tomorrow and the final card on Friday.  There is a poll at the top left corner of my blog for you to vote for your favourite.  The card with the most votes by the end of the week will be the winner.  I'm really excited to see the final results.  I hope you'll join in and vote!

Card #2 - click to enlarge

Card 4" X 5 1/2"
Sizzix Polka dot embossing folder
Spellbinders Nestabilities 3 1/2" Lacey circle die - embossed
Spellbinders Nestabilities  2 1/2" Standard circle large die - embossed
Scalloped circle 1 3/4" punch
Cuttlebug "our baby" embossing folder
1 3/8" circle punch to punch out our baby embossed sentiment
Dimensionals
Inside of card is finished with white cardstock cut at 3 7/8" X 5 3/8" embossed with "Our Baby" in the bottom left corner

Thanks so much for visiting me today!
Have a great day and please don't forget to vote!
Photobucket

Tuesday, April 19, 2011

Baby Shower Thank You Notes

Help me choose!

I've been asked to make Thank You cards for a baby shower.  They are being given to the expectant mom as part of the baby gift.  Other than keeping the cards white and the cost low, the design is being left up to me.  Here are my thoughts.  I will make four different cards, the first one will be posted today and the last of the four cards posted on Friday.  I would love for everyone to help me choose which card you like most and think I should make.  The one with the most votes by the end of the week wins, it's that simple.  Vote at the top left corner of my blog.

Card #1- click to enlarge


Card 4" X 5 1/2"
White cardstock
3" scalloped circle punch
Oval punch
Cuttlebug umbrella embossing folder
Sizzix Polka dot embossing folder
Piercing tool
Card is finished inside with a piece of cardstock embossed with the umbrella in the bottom left corner. 

Thanks for stopping by today! Your wonderful comments always make my day.
Don't forget to vote this week on your favourite card for me.
Have an awesome day!

Photobucket