Showing posts with label Note Cards. Show all posts

Monday, March 21, 2011

Today Is The First Full Day Of Spring


Good Morning!  Today is Monday and it's the first full day of Spring.  It's grey, cold and wet outside, did I mention it's the first full day of Spring?  This week, according to the weather man, we are going to have some cool temperatures, rain and possibly some snow around Thursday.  This happens every year so we'll just have to wait for the warmer Spring weather and sunshine.  Enough about that.

After making last weeks double embossed card I thought I would follow it up with some note cards using the same technique.  If you haven't already noticed, I have this thing for note cards.  I like to give them as little gifts because I think a little hand written note to add to a gift or just given on it's own is always nice to receive.

Here are a few I put together.


This card I have used the negative side (flip side) of the embossed paper


Nice spring colours don't you think? 
To learn how to double emboss visit my cards page.
Thanks for visiting today.

Photobucket

Wednesday, March 16, 2011

Note Card Folder - K & Company Julianne Designer Papers

I wanted to show another note card folder with a slight variation to the Vintage Ladies folder below.  This particular folder I used the slot punch to create the closure while the other folder I used ribbon to secure.


It's nice to have the variety. 


These are the note cards inside the folder.  Unfortunately the camera didn't do the cards or the folder justice.  I find blue photographs very different from the original colour. 

To find out how I made this folder check out my card page. 
Thanks for looking


Photobucket

Saturday, March 12, 2011

Vintage Ladies 3 X 3 Card Holder

Following up on my previous post I thought I would show some of the pictures I took so you could see what the inside and back of the card holder looks like.

This is the resealable bag to hold the note cards
I used brads on the back of the folder to secure the ribbon


To see how this card holder is made visit my card page
Thanks for looking!
Have a great day

Photobucket

Thursday, March 10, 2011

Victorian Ladies Cards and Folder

I found that once I got all my note cards done, three with embellishments and 3 without, I needed to make something to put them in.  They are just slightly thicker than usual so I needed something a little more forgiving.  It took me a while to decide whether or not I would make a box or portfolio.  Well, I did neither.  I thought if I adjusted my gift card holder to hold a set of note cards it might just work, look adorable and make a cute little presentation at the same time.  So....that's what I did and here it is.


I was really happy with the way it turned out and it's just perfect for holding a set of note cards and envelopes.  Check out my cards page to see how it's made. 
Thanks for looking.

Here is the other three cards I made with just a little embellishment on each.


Photobucket

Wednesday, March 9, 2011

3 X 3 Cards

Here is the first group of  3 X 3 cards I made to add to the birthday card from yesterday.  I'm really loving this patterned paper, they all work so well together.  I'm off to make some more cards only this time I'm adding some embellishments to mix it up.


These cards are all made from the same package of "Elegance" papers using various sizes of circle and scallop punches and one stamp set. 


Photobucket

Tuesday, March 8, 2011

Vintage Lady

Yesterday afternoon I decided I would walk through Michaels and have a look around.  Picked up some new things but best of all they had quite a sale on, several items I looked at had 40% off.  I noticed Martha Stewart had 20% off her punches which you seldom see.  The set of 6 Cling stamps I picked up by Hampton Art called Vintage Ladies were 50% off, score!  Great stamp set too if I do say so myself.  I also picked up some wonderful printed cardstock that I thought would look great with the stamps.  I made a lovely Birthday card using one of the stamps and I plan on making a set of note cards to match, as a gift.


Unfortunately I don't think that the camera did this card justice.  Check out my cards page if you would like to know how I made this card.
Thanks so much for looking!


Photobucket

Friday, February 18, 2011

Old World - Note Card, Envelope and Stationary Box

To finish the week and using my Old World Designer Papers as planned, I decided to add one more element to my note cards and envelopes.  I've added the Stationary Box to complete the set.  I found this box on a blog where the publisher loves to make different boxes and she provides all the step by step instructions for a nominal fee. 


Here is a picture of my completed set.  It looks amazing!!!


I'm planning to add my own step by step instructions for the box eventually.  Until then and for those who can't wait, I've provided the site where I found them. 
Please visit my card page to obtain information on the Stationary Box. 
Thanks for looking!


Thursday, February 17, 2011

Old World - Note Card and Envelope

  Look at me!  I'm still sticking to my plan and using the Old World Designer Paper.  Today I'm using the designer paper as a topper to my note cards which I embossed with the Sizzix Damask embossing folder before adhering to each note card.  You can use any embossing folder you wish but the one I chose matched the design of the paper.  I only used the middle of the folder to emboss to get the part of the design I wanted.  I attached the embossed paper to the note card adding a little bling, a ribbon, stamped a border along the bottom of the note card as well as the back of the envelope flap.  Here you have a very elegant note card with matching envelope.  Awesome!


What a beautiful set of note cards.  Please visit my cards page to learn how to make yourself a set.
Thanks for looking!

Monday, February 14, 2011

All 4 Note Cards And Matching Envelopes


Here are all four of the finished note cards. There were enough different Designer Papers that each card has it's own look and I like that.   As mentioned before the layout stayed the same only the papers changed.  I've seen so many beautiful designer papers out there that any number of them may be used to create some lovely note card or stationary sets.  I've love giving note cards and stationary sets to people.  They're wonderful to have around when you want to add that little something extra.  It's always great to receive a nice hand written note along with a gift that says thanks or thinking about you or even get well. 


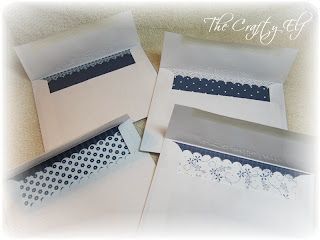
To have your envelopes really make a statement, try adding matching papers to the inside of the card. 


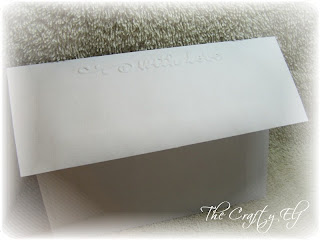
I've even added a little embossing to the flap.  What a great little note card set, matching envelopes and the little extra embossing on the flap.  Too cute!


Check out my cards  page to learn how you can make this note card set with matching envelopes. 
Thanks for looking!

Saturday, February 12, 2011

Blue and White Card #2

Here is the second card I made with the Stampin Up Patterns Pack III Designer Paper using the blue and white papers.  These colours are fantastic together and I think this card is just as pretty as the first.  I have 2 more cards to make and then I'll have a note card set.   


If you'll notice, I've kept the same layout as the first card and only changed the papers used. 
If you would like to see how to make this card, visit my card page.
Thank you for looking!

Friday, February 11, 2011

Blue & White

There's just something about blue and white isn't there, it looks so elegant and clean?  I really like how this card came together.  Once again I used the Designer Papers in the Patterns Pack III from Stampin Up and used only two colours.  Now that this card is done I think I'm going to make 3 more co ordinating cards and make a note card set.  I will add the pictures when I'm done.


Let me know what you think about the card and the two colours together.
Visit my card page to learn how you can make this card.
Thanks for looking!